Perforce Admin Setup
§ Setting Up A Perforce Server
§ Why?
- Git issues
- does not accept large files above 40Mb
- treats binary files poorly (ex. scene merging in Unity)
- Larger studios typically use Perforce instead of Git
§ What?
- Specifically, Perforce Helix Core
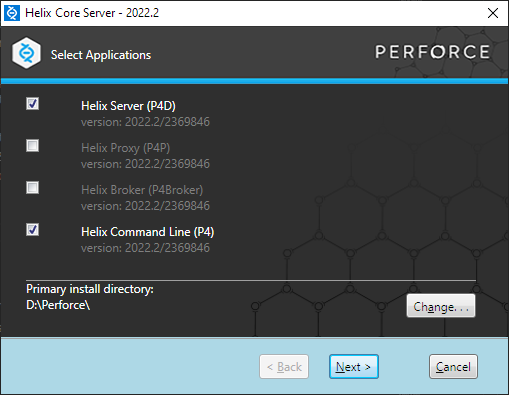
- Helix Server (
p4d) - Helix Server Clients (P4 commandline client, P4V GUI client)
- For brevity, these will be called "Perforce" as we are not using anything else from Perforce
- Helix Server (
- Linux server, example using Vultr (relatively low pricing + personally more familiar with it)
The exact VPS vendor is not that relevant except for the firewall step. As long as you choose Ubuntu LTS 22 the in-server steps should be exactly the same. If you intend to setup Helix Swarm, check out their compatible Linux distros which should contain a Ubuntu LTS version. The walkthrough will not include Swarm and will go with the lastest LTS (as of writing, newest is version 22 but Swarm prefers version 20).
- AWS has a free tier, this document goes over the steps for AWS
- RamNode has HDD servers with slower but larger drives at similar pricing
- Linode has a similar 25GB storage 1TB data plan but also with 10GB per extra dollar
I later found that Vultr's Object Storage can be mounted on your server via network, and you can choose between SSD/HDD as well.
§ Limitations
- Perforce is free for 5 accounts and 20 workspaces, beyond that you will need to contact Perforce sales and get a quote, usually starting at $160 per license as the time being
- These accounts are created by you, unlike GitHub registration done by team members individually
- Each workspace stands for a local connection (elaborated later). If you use Perforce on two of your computers then that takes up 2 out of 20.
§ Clarifications
- For convention, if something needs to be filled in it will be noted as
<thing you need to fill in>. The brackets need to be dropped when you fill in your own!- ex. If you want to fill in
aandbinto<your first text>:<your second text>, the result isa:bnot<a>:<b> - I have seen some articles using
{{}}instead of<>so this is just clarifying
- ex. If you want to fill in
- Ideally no concept should be used without being brought up in previous sections. If you are confused about which software/file a name refers to, refer to previous sections
- For any server-related concepts, check out the Vultr server tutorial
§ Installing Perforce on the Server
This section assumes you have a server set up on Vultr or an equivalent VPS. Steps should be similar for other VPS vendors.
Original instructions can be found here named "Install Helix Server on Linux"
- Navigate to to the Perforce Helix Core frontpage and register an account for yourself
- Optional: Restart the server instance
- There is a warning every time after installing through
apt-getto restart and update the kernel, so this step might as well be done in the beginning - (Not sure what the consequences are if you do not do it)
- There is a warning every time after installing through
- Login to your server through SSH and
-
Recommended optional: Verify perforce public key
official instructions updated here. Original section on this writeup removed due to difference with official document.
-
Add the key (mandatory)
wget -qO - https://package.perforce.com/perforce.pubkey | gpg --dearmor | sudo tee /usr/share/keyrings/perforce.gpg
-
Create Perforce repository file
touch /etc/apt/sources.list.d/perforce.list- In the file, add in the line
deb http://package.perforce.com/apt/<os> <version> releasewith your preferred text editor- For Ubuntu 22.04LTS I used
ubuntuas os andjammyas release. As of writing, the official documents do not mentionjammyyet but it is usable.
- For Ubuntu 22.04LTS I used
-
Install Perforce
sudo apt-get updateto "discover" Perforce software after adding the key- CAREFUL: running this before adding the key does not work and you will get something like
cannot locate package
- CAREFUL: running this before adding the key does not work and you will get something like
sudo apt-get install -y helix-p4d
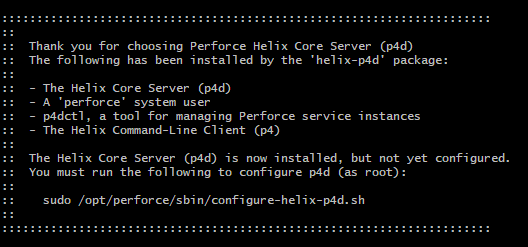
-
After installation finishes, you should see a message like this
-
§ Optional: Mounting HDD Object Storage
- Different VPS has different ways to approach this step. For Vultr object storages are connected to the server instance through a network
- Run
lsblkto see all drives connected. For mine, it shows avdbdrive with the size40G- Currently, the drive is just blank space with no file system on it, so it could not be mounted yet
- Because of it's name, the actual device address of the drive is
/dev/vdb. You can check byls /devorll /devand see if any device file matches whatlsblkreturns
- Run
mkfs.<file system> /dev/<drive name>to initialize the file system. I usedmkfs.ext4for mine but feel free to use other ones as long as it is compatible with your system - Run
mkdir -p /perforceto create a specific directory to mount this drive into - Run
ls /perforce, you should get a file calledlost+foundlisted and nothing else if you are using ext4
This section is written after the original tutorial. The rest of the tutorial will keep using
/opt/perforce/serversas the path for perforce server data. Note that any other perforce data like the scripts in/opt/perforce/sbinare already installed in the previous step, and should not be moved into/perforce.
§ Installing
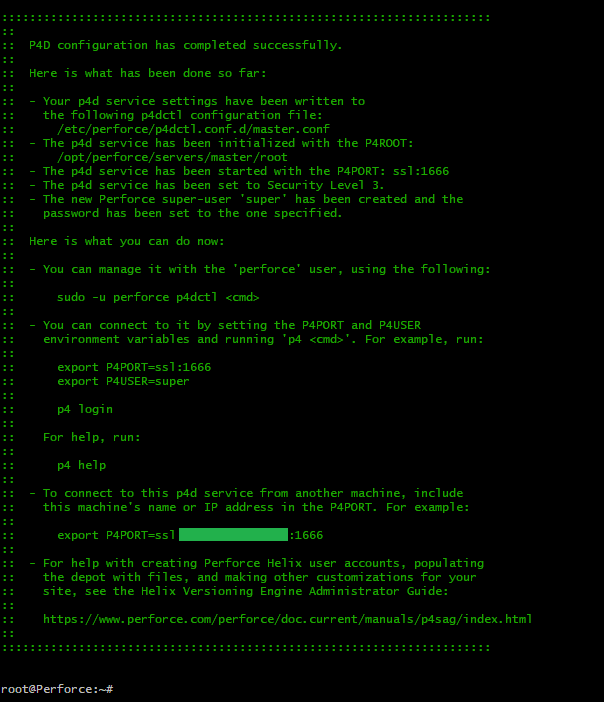
-
Run the
/opt/perforce/sbin/configure-helix-p4d.shscript,Enterto choose default settings for things like port- Be sure not to choose these ports
If you followed the previous step, you should not set the root folder on your main drive following the default instructions. This post describes the possible issue of Perforce not using the correct drive. After finishing the server setup, you should always check the amount of available spaces using the P4V admin tool.
-
Note: the
perforceuser is automatically created for youperforceis the name of the user in the Linux system that the Perforce service runs undersuper(or the name you chose in thesuper userprompt) is the user that the Perforce service recognizes
-
Congrats, you have installed Perforce on your server!
§ Verification
- Run
p4dctl listto see all running Perforce instances. There should be at least one instance
§ Installing P4V
Original instructions can be found here named "Install Helix Core Visual Client (P4V)"
-
Optional: Text editor can be overrided during the installation, the default one for Windows was set to notepad and I changed to VSCode. This does create some hassle later on
-
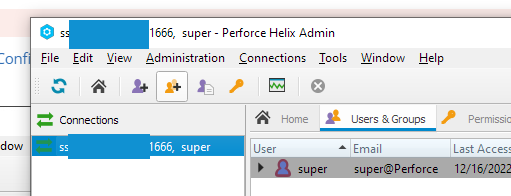
Try creating a new user from the P4Admin client, a connection error like below could happen

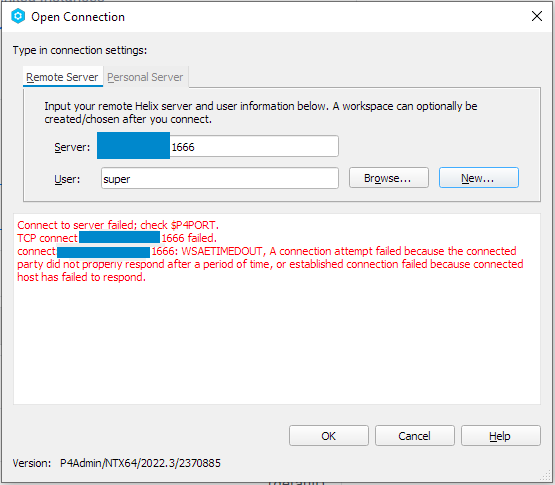
§ Resolving the Connection Issue
Original instructions from here named "Perforce Helix WSAETIMEDOUT".
- The elaborated sections solved my own setup, but might not be the whole solution for yours.
- There are more steps in the original instructions.
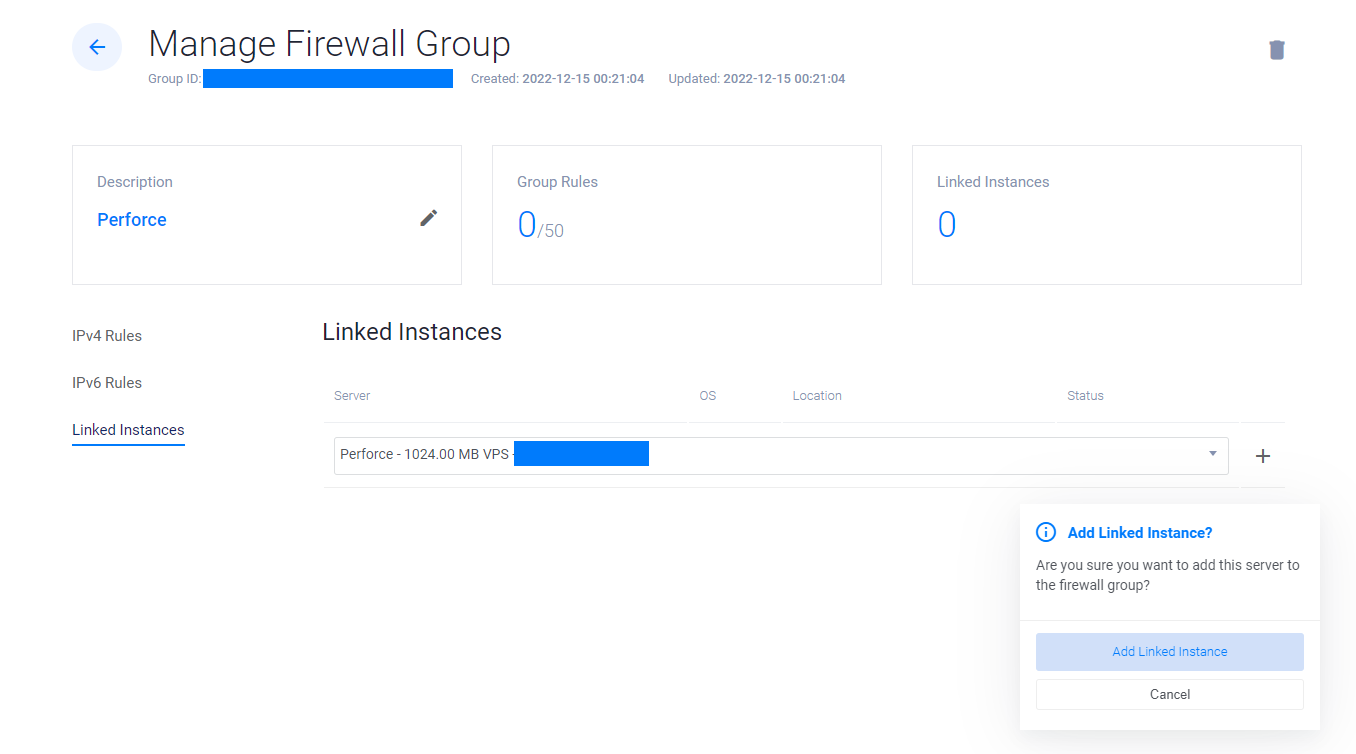
§ Configuring Vultr Firewall
- Having Perforce running on
localhost:1666does not guarantee it to be available at<ip or destination>:1666, since not all ports are allowed external access by default - Navigate to your Vultr landing page and go to the Firewall tab
-
Add a new Firewall Group
-
Link the server instance to this group
-
- According to Perforce
For Helix Server applications, the protocol, host and port number of the Perforce service with which to communicate. The most commonly-used communications protocols are tcp (plaintext over TCP/IP) or ssl (SSL over TCP/IP).
-
Firewall rules should be added to allow the TCP protocol at the 1666 port (or whichever port your Perforce instance is listening to)
-
In addition to that the original SSH port should also be allowed so you can still access commandline
-
The finished rules look like this:
-
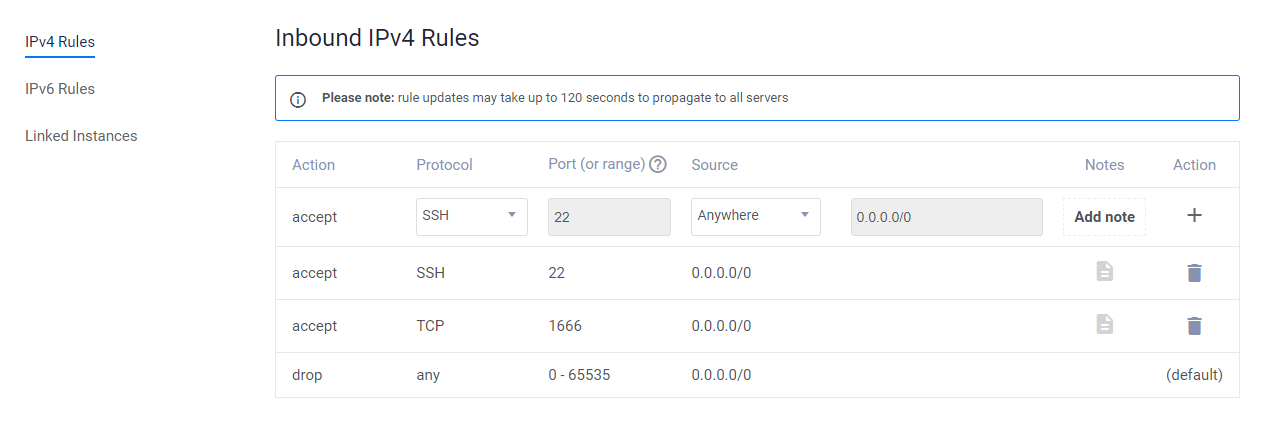
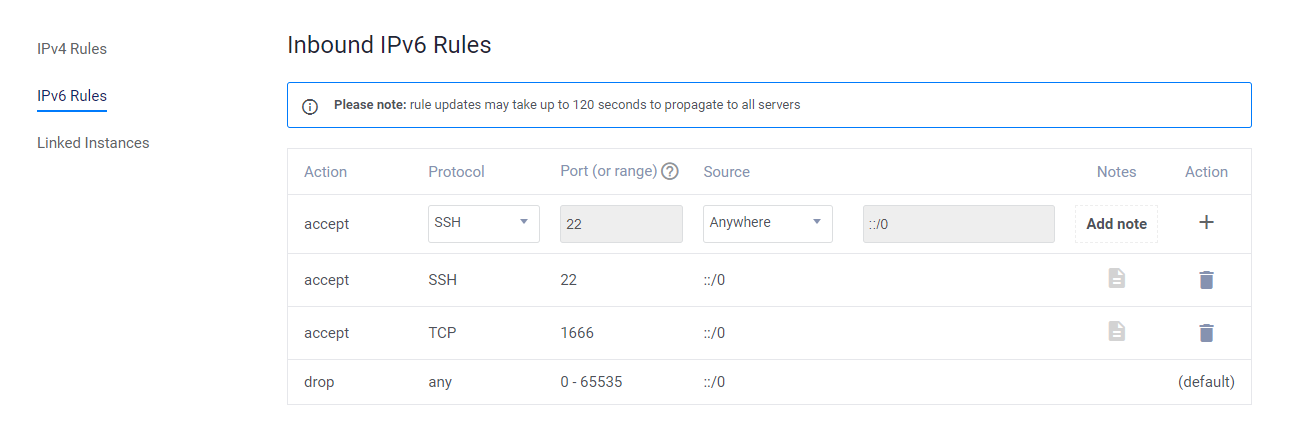
§ Configuring the Server Firewall
- The server itself has another layer of firewall, to open this one run
ufw allow 1666in the server commandline- Other Linux distros have different commands listed here
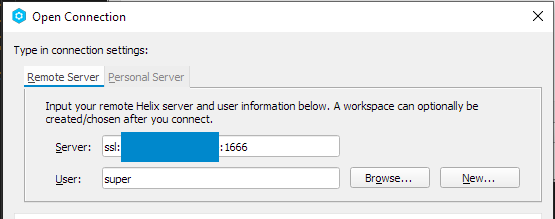
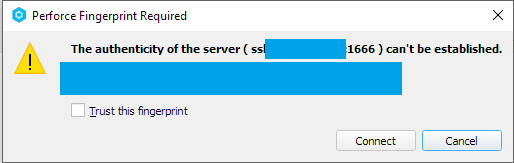
§ Opening the Connection
-
Fill in the information below and click "Open"
-
The
ssl:prefix should only be added if your server is encrypted (which is by default) -
Trust the server
-
-
Congrats, you have set up a local connection to the Perforce server!
You now have Helix Core set up. Now, depending on how you are using this walkthrough...
- If you are not following the entirety, I recommend you jump to this step before completing anything else. This step describes configurations that saves space on the server while also making Perforce behave more similarly with Git.
§ Setting Up Version Control
- The official documentation goes over several configurations for the server in general as well as specfic projects
The Helix Core Quick Start Guide provides initial steps for admins to setup the server, as well as links to Unity/Unreal specific guides
- For small teams it is sufficient to have the server owner also be the depot owner for the project
- For larger teams or teams with multiple depots for different projects, it is better to elevate other users (project leads) to have the
superpriviledge so they can create depots themselves
- For larger teams or teams with multiple depots for different projects, it is better to elevate other users (project leads) to have the
§ Terminology Comparison With Git
The Helix Core Basics documents go over concepts in version control
-
Overview
§ Names
- A Depot is similar to a Repository in Git
- They are created by teams (user with the
superpriviledge) and edited by team members - Depots typically have a mainline, similar to how Git repositories have default branches called
master/main
- They are created by teams (user with the
- A Stream is similar to a Branch in Git
- They are created by team members and synched with each other
- A Workspace is a local folder managed by Perforce, similar to the OneDrive folder or a folder containing the Git repository locally (the folder that appears after you
git clonea project from GitHub)- They are owned by team members and syncs to/from depots
- A Changelist is the Perforce analogy to a Git Commit. Unlike Git, Perforce allows multiple ongoing changelists (you can choose which one the file goes into when adding the file)
- A Changelist Description is equivalent to a Commit Message on Git
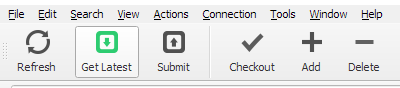
§ Actions
- A Git Pull is reflected in two different actions in Perforce
- Checkout pulls the latest version with read and write priviledges
- Get Latest pulls the latest version but without write priviledge
- A Submit is the Perforce analogy to a Git Push
- A Refresh is the Perforce analogy to a Git Fetch
- Git Pull Requests are handled by Helix Swarm which is not part of this walkthrough. For small teams it should be sufficient to message your lead to merge changes in.
Perforce provided this cheatsheet for commandline
§ Software
- Similar to GitHub + Git, Perforce has a commandline and GUI
- The commandline is
p4, analogous togit, and is installed with P4V - The GUI is P4V, analogous to GitHub Desktop
- The commandline is
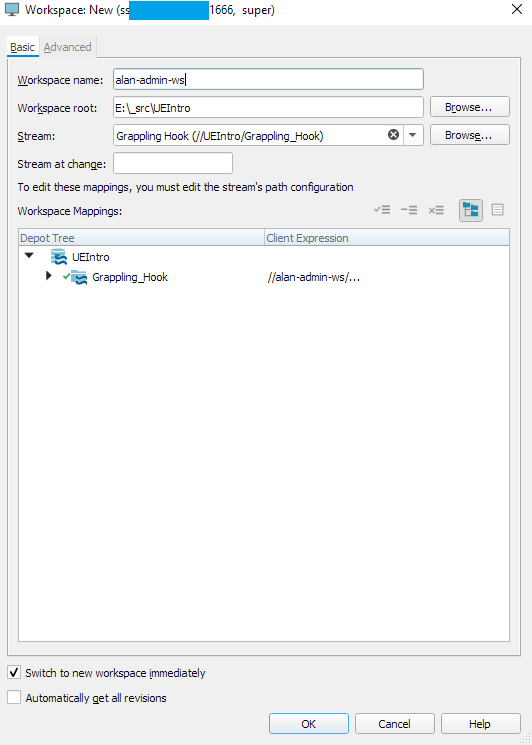
§ Creating Depots & Workspaces
Original instructions here as part of the admin quickstart.
- Creating a depot, here the name is the project name instead of a shared name for the organization
-
Navigate to P4V's top bar
Tools/Administration(or just open P4Admin) -
Navigate to the
Depotstab on the right and right clickNew Depot(you need to right click on some existing depot for the menu to show up) -
Enter the name of the depot and choose
Streamas Depot Type and1as Stream Depth (explanation here) -
Navigate back to P4V and refresh the
Depotstab on the left to show the newly created depot
-
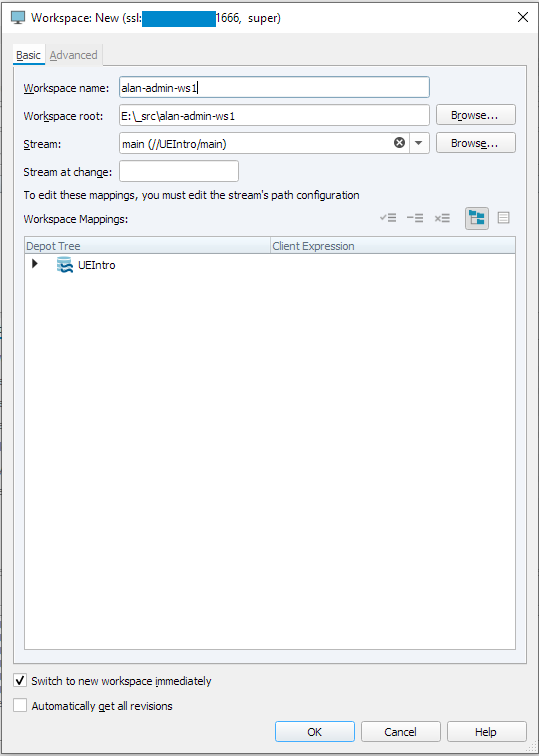
- Creating a workspace, conventionally named with your own name
-
Navigate to P4V's
Workspacetab on the left and create the workspace from the dropdown -
Refresh if the workspace does not already show up. If you have used GitHub Desktop or SourceTree before the topbar should be very familiar :)
-

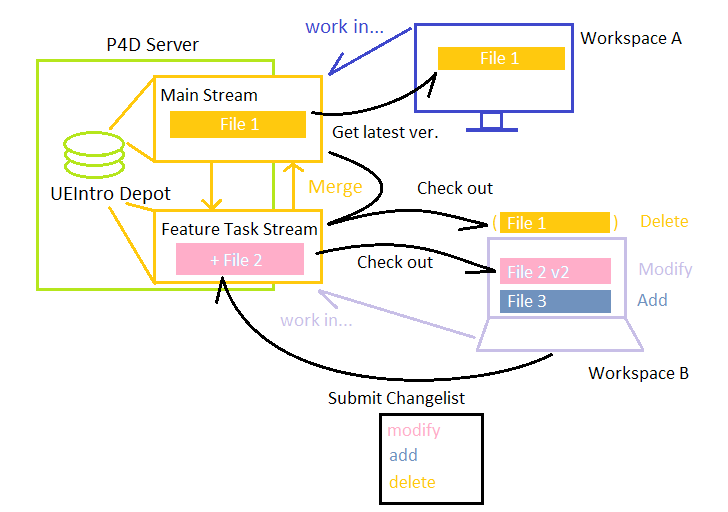
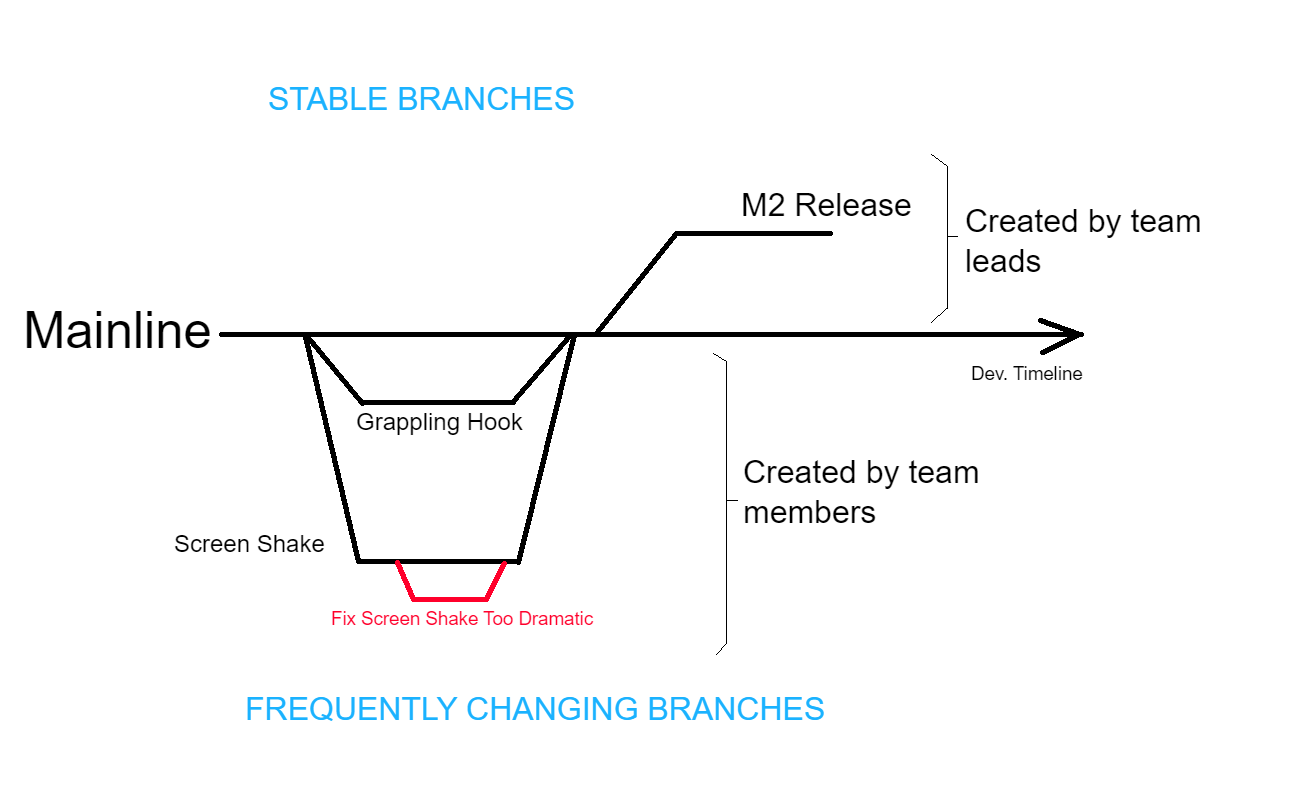
§ Branching (Part I)
This section doesn't actually have any steps, they prepare concepts used in the next section where actual files are added to the workspace
-
An example branching format is the one below where
- The main branch acts as an "authoritative dev branch"
- Feature branches...
- Are created and owned by devs
- Close after being merged to main
- Release branches...
- Are rare, since builds are usually stored locally and ignored by VCS
- Close without being merged, unless there are patches added
-
In the Mainline view in P4V
- Image from Perforce
§ Difference: Stream Depth
- What is stream depth?
- Streams can be organized into collections
- One level of collection adds one depth to the stream
- For example the stream
//com.bob/MyFirstGame/mainhas 3 levels of depth- A sibling branch can be created called
//com.bob/MyFirstGame/grappling_hook
- A sibling branch can be created called
- This is really only relevant if you want to use the same Depot across different teams and projects, for one depot per project having a maximum stream depth of 1 is enough
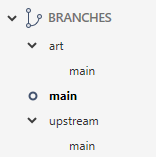
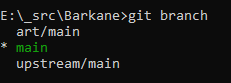
- Comparison to Git
-
Git branches don't really have builtin depth support, you can add slashes in the name like
features/grappling_hookbut the branch is still siblinng to all other branches -
Typically tools from Atlassian like Bitbucket and Sourcetree can recognize these patterns and show "folders" in their UI, but this is not a native Git feature
*Screen crop from Sourcetree showing/art/main,/upstream/main, and/mainbranches, note that this isn't shown ingititself
-
§ User Management
§ Creating User Groups
-
Open P4Admin and click the orange plus icon on the top bar
-
Fill in the group name and description
-
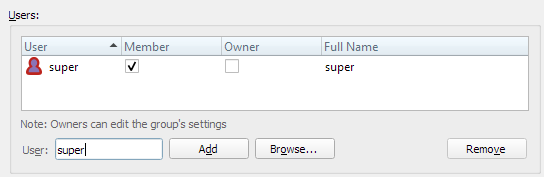
Add yourself to the group
-
Ok
-
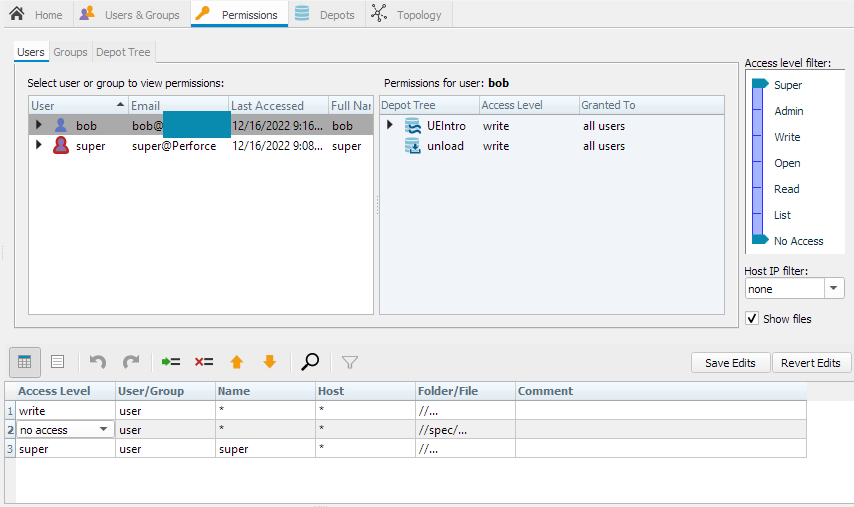
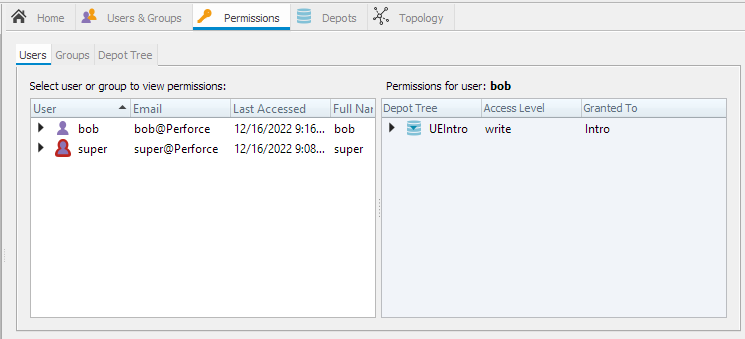
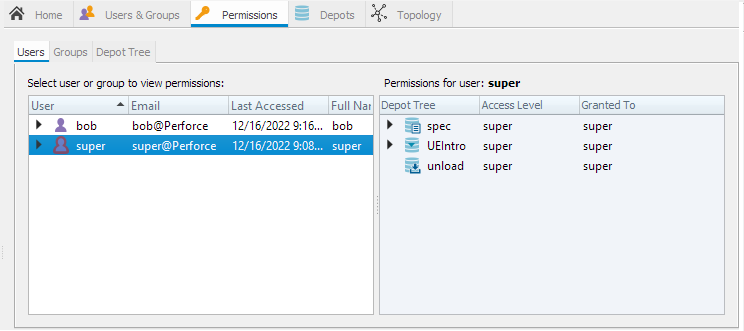
Navigate to Permissions and check that the permissions table is showing at the bottom
-
Delete the first entry (
write user *) so that users are not given write access by default -
Edit the second entry as such so that members in the
Introgroup can edit theUEIntrodepot -
Click
Save Editsto apply permission changes
-

§ Creating Another Account
-
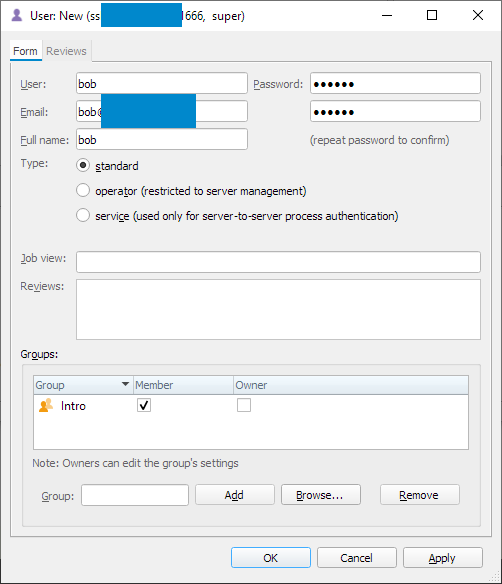
Open P4Admin and click the purple plus icon on the top bar next to the group creation icon
-
Fill in relevant information and add the user in the group
- Type in the group name and click Add if the group does not already show up
-
Check that users have correct permissions in the
Permissionstab
§ Optional: Allow Users to Open Streams
-
Usually on Git, team members create their own branch. This behavior is not allowed by default on Perforce
Since streams take up space on the server machine (even task streams by some extent), you should inform your team members
- not to open streams unless needed
- tell you when streams are no longer needed and could be closed (typically for short-living feature streams this is done right after changes are merged)
-
To add the permission, follow the same steps with previous sections but use the
openstreamspec(reference)

§ Optional: Allow Anyone to Register New Account
This might be preferrable if your license has unlimited user count. A sample protection table is provided here:
read group read_users * //...
write group write_users * //...
read group foo_project_reviewers * //depot/foo/...
write group foo_project_devs * //depot/foo/...
read group bar_project_reviewers * //depot/bar/...
write group bar_project_devs * //depot/bar/...
super group super_users * //...
Be sure to replace the paths with your own roles and depot paths.
§ Integrating with Unreal Engine
This section combines documents from Unreal and Perforce. Be sure to select your version of Unreal when viewing their original documents.
At the time being, the Unreal document still has "Unreal Engine 4" in its title, don't worry if you're also seeing that.
-
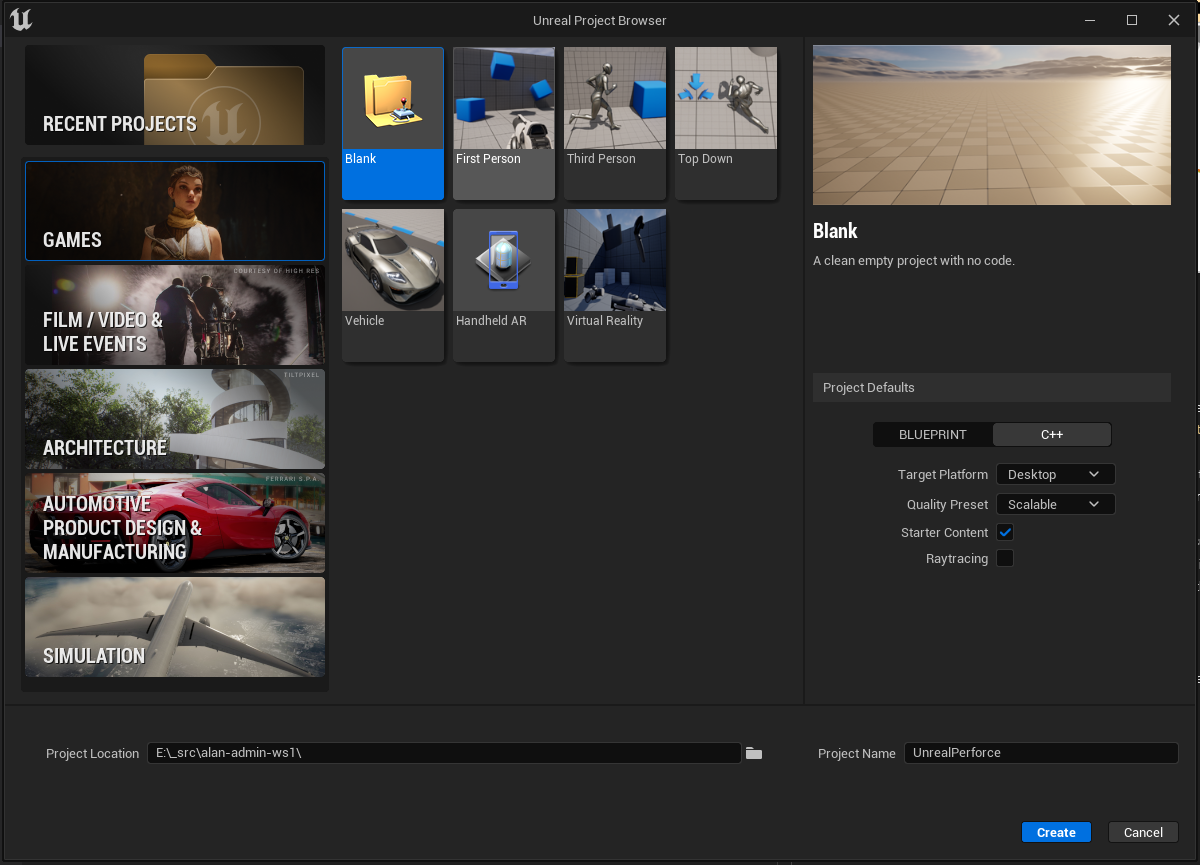
Install Unreal Engine 5 and create a new blank project under the workspace
- For the sake of demonstrating asset tracking, select the
Starter Contentoption
- For the sake of demonstrating asset tracking, select the
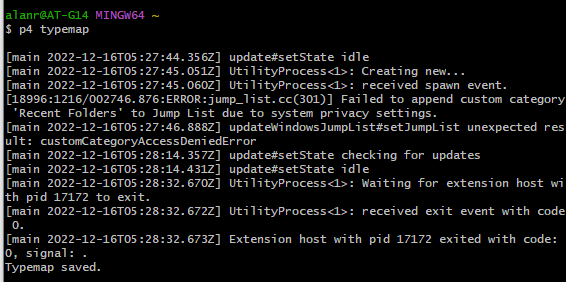
§ Setting Up the Typemap
- The Typemap guides Perforce to recognize files as code or binary, and treat them differently.
- Typemaps are given to the entirety of the Perforce server instead of specified per depot. You can add specifications in the path yourself
- Unfortunately I could not find a way to do this in P4V, so instead open a local commandline (any shell is fine) and run the following commands
-
p4 set P4USER=<your username> -
p4 set P4PORT=<your port> -
p4 loginand fill in password -
p4 typemap -
CAREFUL: if you chose to override the p4 text editor like I did, close your existing text editor windows before preceding
-
A temporary file editor will pop up at this point, probably with some existing value
-
Append your own typemap (choose from sections below) to the bottom
-
Save and close the file, the commandline should return as well with a message.
-
- Unfortunately I could not find a way to do this in P4V, so instead open a local commandline (any shell is fine) and run the following commands
§ Global Typemap
-
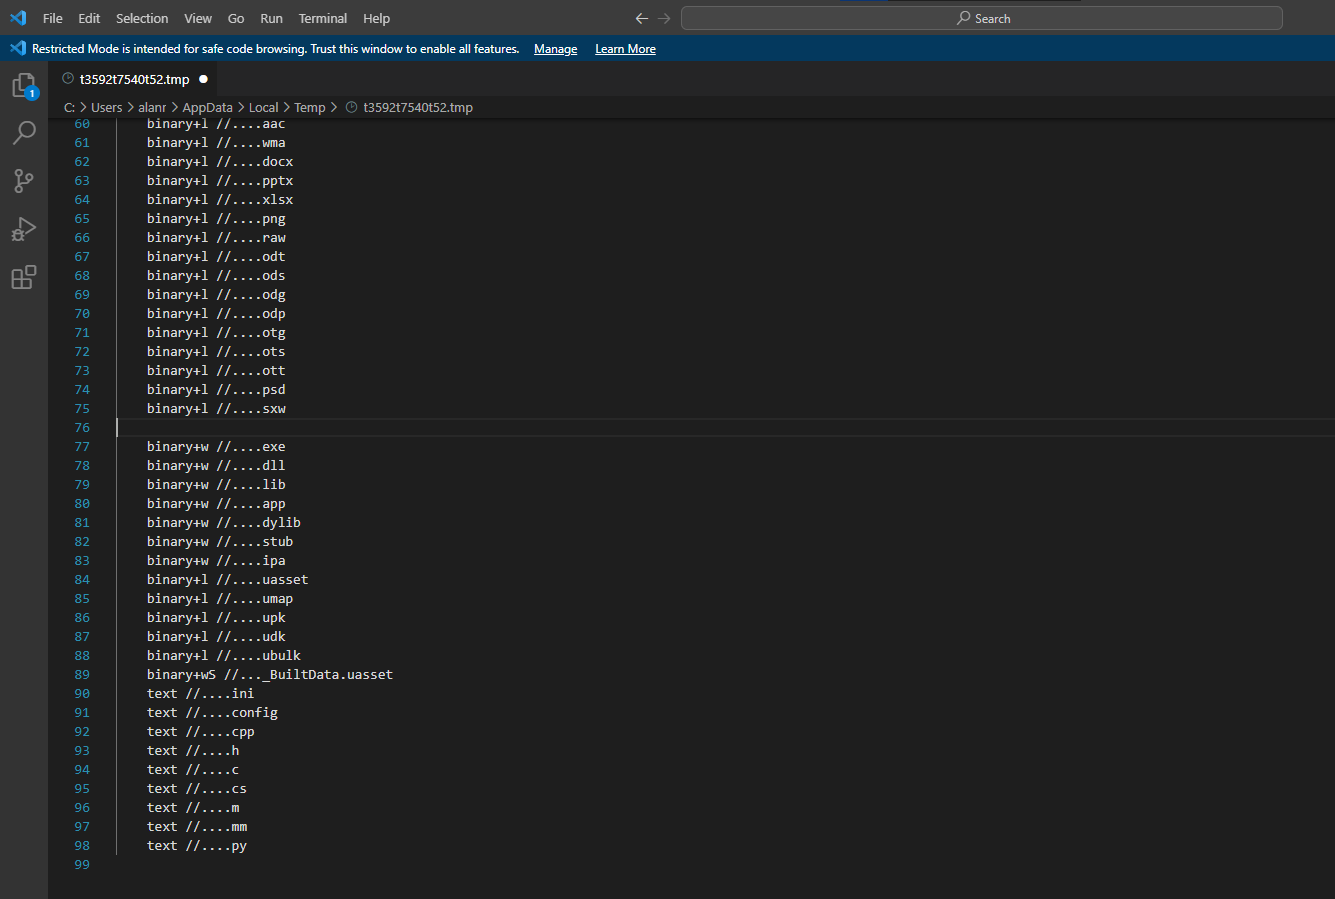
The Perforce document gives a sample Unreal global typemap
Typemap: binary+w //....exe binary+w //....dll binary+w //....lib binary+w //....app binary+w //....dylib binary+w //....stub binary+w //....ipa binary+l //....uasset binary+l //....umap binary+l //....upk binary+l //....udk binary+l //....ubulk binary+wS //..._BuiltData.uasset-
Just to be constant with the Unreal documented version, you can also add this following segment
text //....ini
text //....config
text //....cpp
text //....h
text //....c
text //....cs
text //....m
text //....mm
text //....py
-
§ Depot Or Lower Level Typemap
-
The Unreal document gives a depot-specific setting (replace
depotwith your own depot name), note that you can also specify the path furtherTypeMap: binary+w //depot/....exe binary+w //depot/....dll binary+w //depot/....lib binary+w //depot/....app binary+w //depot/....dylib binary+w //depot/....stub binary+w //depot/....ipa binary //depot/....bmp text //depot/....ini text //depot/....config text //depot/....cpp text //depot/....h text //depot/....c text //depot/....cs text //depot/....m text //depot/....mm text //depot/....py binary+l //depot/....uasset binary+l //depot/....umap binary+l //depot/....upk binary+l //depot/....udk binary+l //depot/....ubulk-
Just to be constant with the Perforce documented version, you can also add this following segment
binary+wS //depot/..._BuiltData.uasset
-
§ Writting Your Own Typemaps
- Some good explanations are given here in case you encounter issues with file locking and other operations, or are using your own custom filetypes
§ Ignoring Files
- P4's ignore mechanism is similar to Git's
.gitignore - The syntax of P4's ignore files is very similar with Git's ignore files, it is possible to just use an existing
.gitignorefor P4 - Related resources:
- Toptal's very well maintained gitignore generator and a sample for UnrealEngine alone (remember to add Mac support if anyone on the team uses a Mac)
- FMOD's generated gitignore file for related content. In newer versions of the plugins it is typically included as an instruction in the engine integration steps.
- Generally, ignore folders called
BuildandBuilds, as well as files called*.log
§ In-Project Ignore Files
- This is exactly the same as Git, just add the
.P4IGNOREfile inside a project folder and it will ignore based on relative paths to that folder- If this doesn't work, do
p4 set P4IGNORE=".p4ignore"and check again - You can check whether it works by navigating to the folder on commandline and do
p4 ignores -v. This should list all the files that Perforce ignores in the current folder.
- If this doesn't work, do
§ Local Ignore Files
Use case: for some reason, you want to ignore files on your own computer without making changes to the shared
.P4IGNOREfiles
- This has to be done on the commandline
- Run the following commands
p4 set P4USER=<your username>p4 set P4PORT=<your port>p4 loginp4 set P4IGNORE=/path/to/your/ignore/file
- Registering multiple ignore files
- separate with semicolons
p4 set P4IGNORE=/path/one;/path/two
- Run the following commands
§ Adding Files (Not Recommended)
After finding some differences between Git's
addand P4'sadd, I recommend checking out reconcile and using that instead. It gives a closer approximation for GitHub Desktop GUI where it shows all the differences between local and remote, and gives you the ability to select which ones to add to the changelist.
-
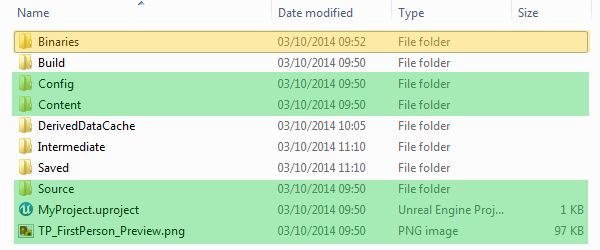
The Unreal document gives directions on what folders to add/exclude, as below
- The
Sourcefolder is just for C++ projects
- The
-
You might need to include extra folders if you have an FMOD project to track as well
FMOD provides this official guide for integrating with Perforce.
§ Quick Adding
Complete the ignore section first because you might add unwanted files in this step.
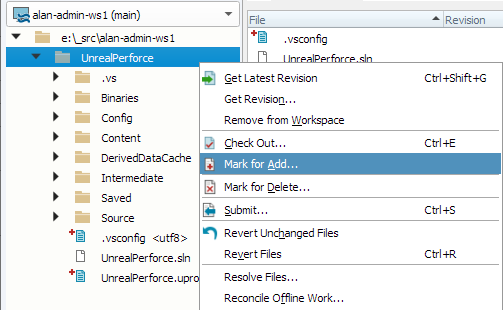
-
Right click
Mark for Addon the entire Unreal project folder -
When working on the project after initialization, you would want members to add individual files manually unless it becomes too bothersome, otherwise unwanted files may be added
- When folder-adding must be done, make sure to let them ignore files as described in the Programming workflow walkthrough.
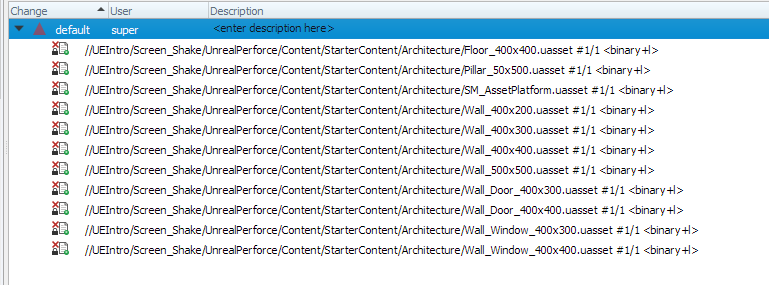
§ Completing the Addition
-
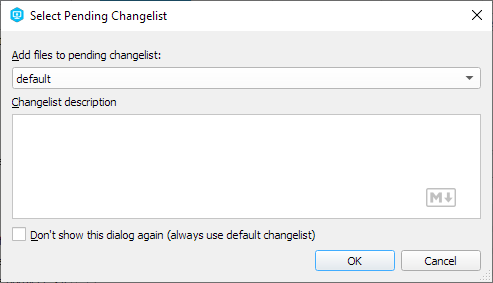
After marking for add...
-
Select append to
defaultchangelist -
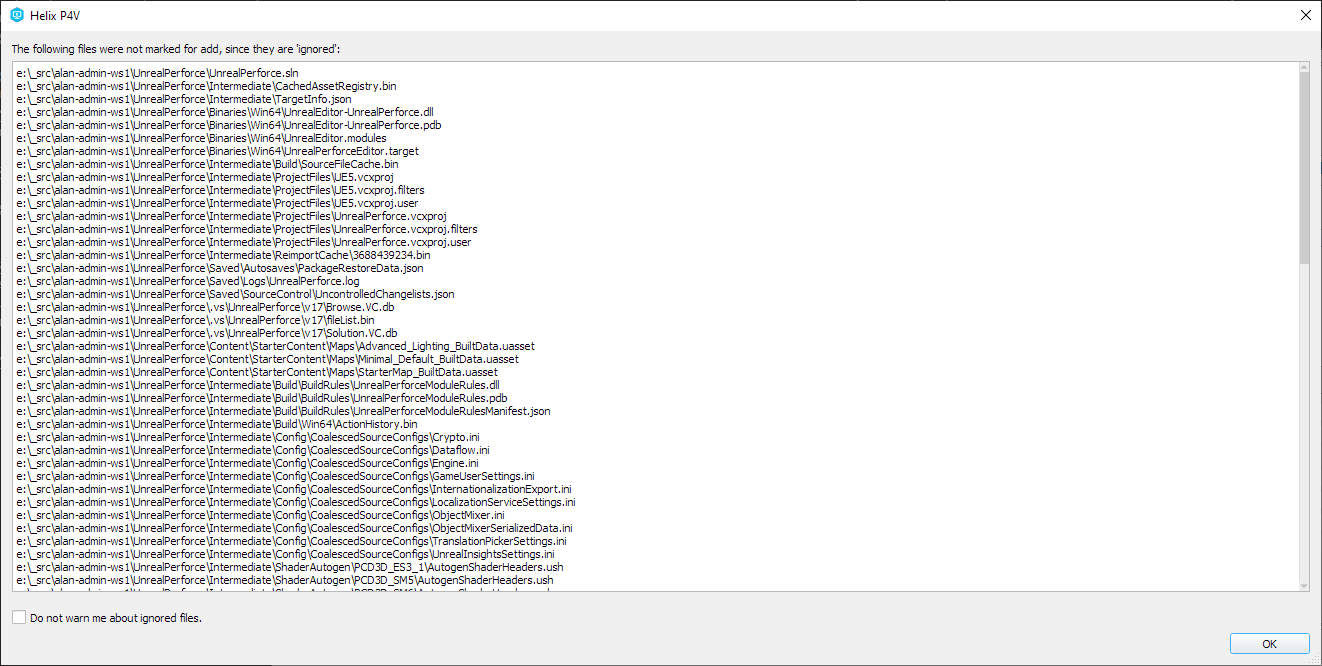
Check that files are being ignored correctly in the warning
-
-
After everything is added, check that things in ignored folders like
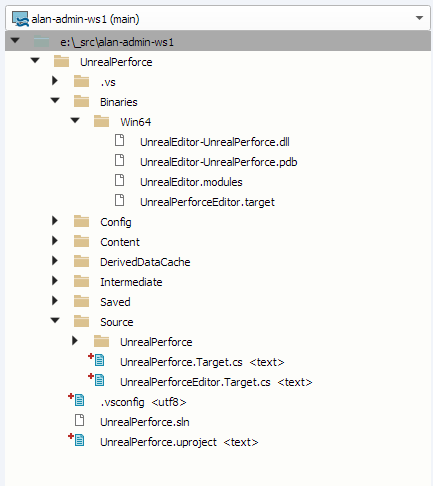
Binariesare not marked with the red + sign, and that things in non-ignored folders likeSourceare marked -
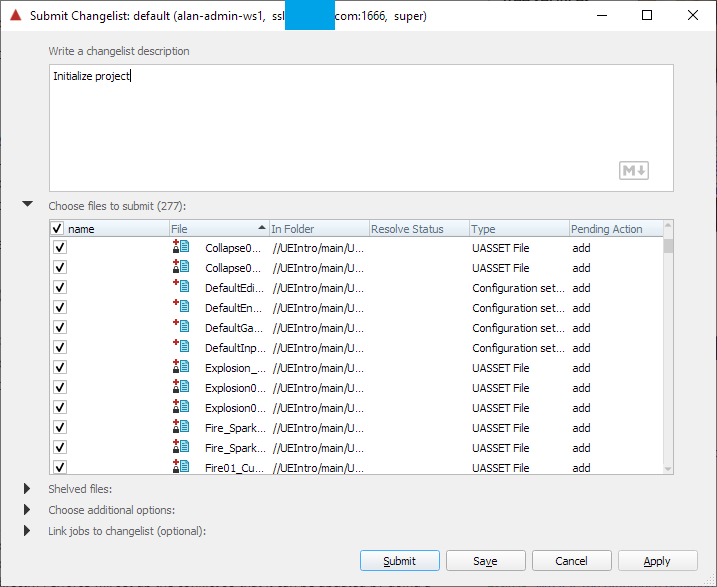
Submit the default changelist
-
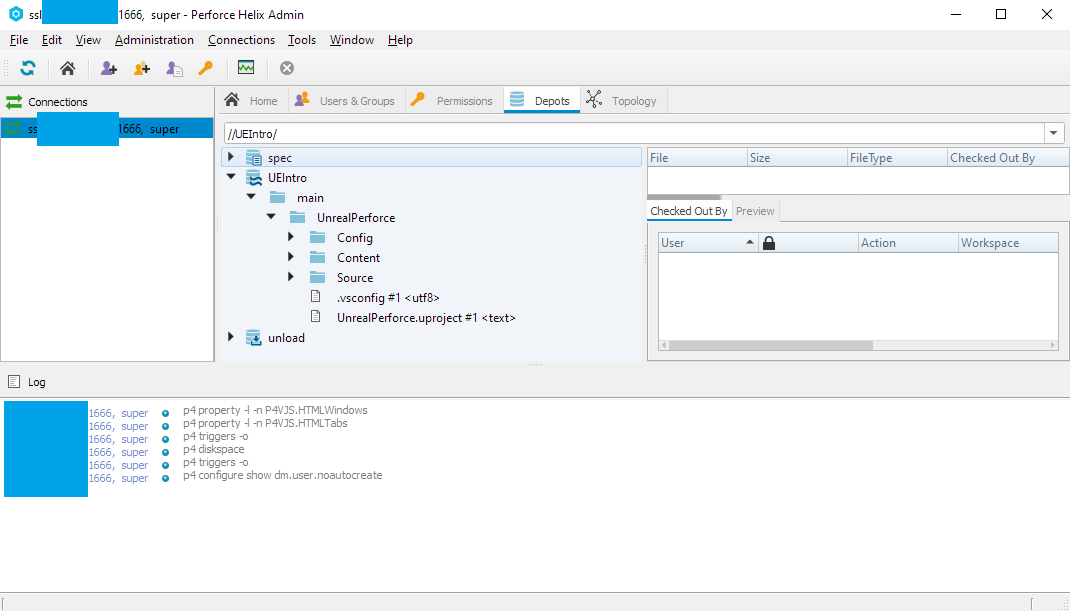
To check that changes are applied to the depot itself, open P4Admin and check the project depot
-
If you want to further check, log on to Vultr and enter your server dashboard
-
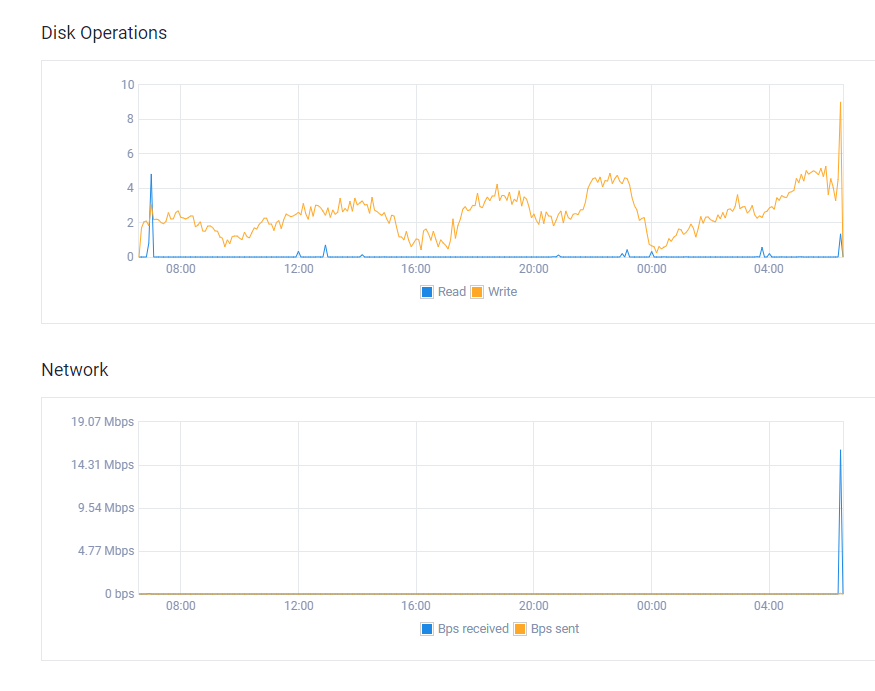
Navigate to
Usage Graphs, there should be a spike both in disk operations and network because you have sent a bunch of files to the server for it to write to its own disks
-
§ Deleting Files (Not Recommended)
-
On Git,
addadds all changes, meaning it records additions, editions, and deletions -
On Perforce, deletion is a separate action from
add, so you need to mark a file for deletion- This deletes the file locally as well
-
If the file you want to delete has not been submitted yet (i.e. it's currently in a pending changelist), you can delete it by reverting it inside the changelist
- Be sure to select the
Delete files opened for addoption or else the file will not actually be deleted (This is similar to removing the cache of the file in Git but not the actual file)
- Be sure to select the
§ Reconciling (Recommended Alternative)
I recommend only using reconciling instead of adding/deleting since the functionality is the same and it feels more like Git.
If you are using add / delete, there is still a use case for reconcile: you deleted something in-engine and could not possibly mark those files for deletion. This section will go over this use case as it follows directly from the add and delete sections.
-
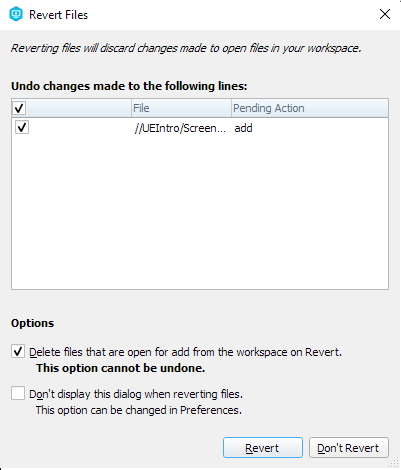
To test this out, let's delete all the files from
Starter Content/Architecture -
Navigate to P4V's top bar Actions, and select
Reconcile Offline Work- Your deleted files will show under
Depot files missing from workspace, this is because you deleted those files but they have not been marked for delete
- Your deleted files will show under
-
Apply, and check that your default changlist (in the
pendingtab) contains deletions

§ Connecting Within the Engine
The original instructions have not been updated with UE5 yet, this Perforce articles touch on some points corresponding to the UE4 documents
-
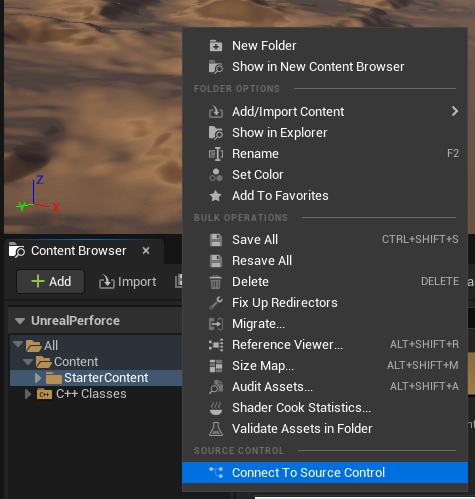
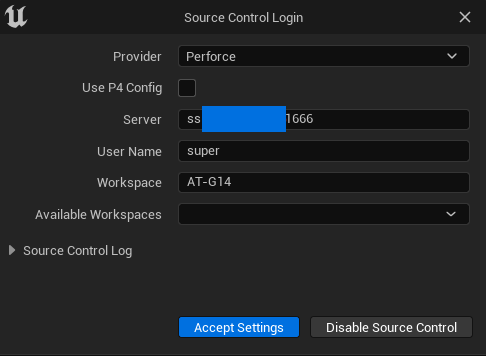
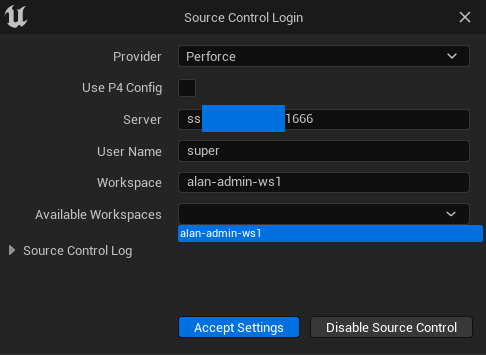
Right click in the content browser and log in to source control
-
Unreal should detect local settings and help you fill in some fields
-
Switch to the correct workspace from the Available Workspaces dropdown
-
Accept Settings
-
-
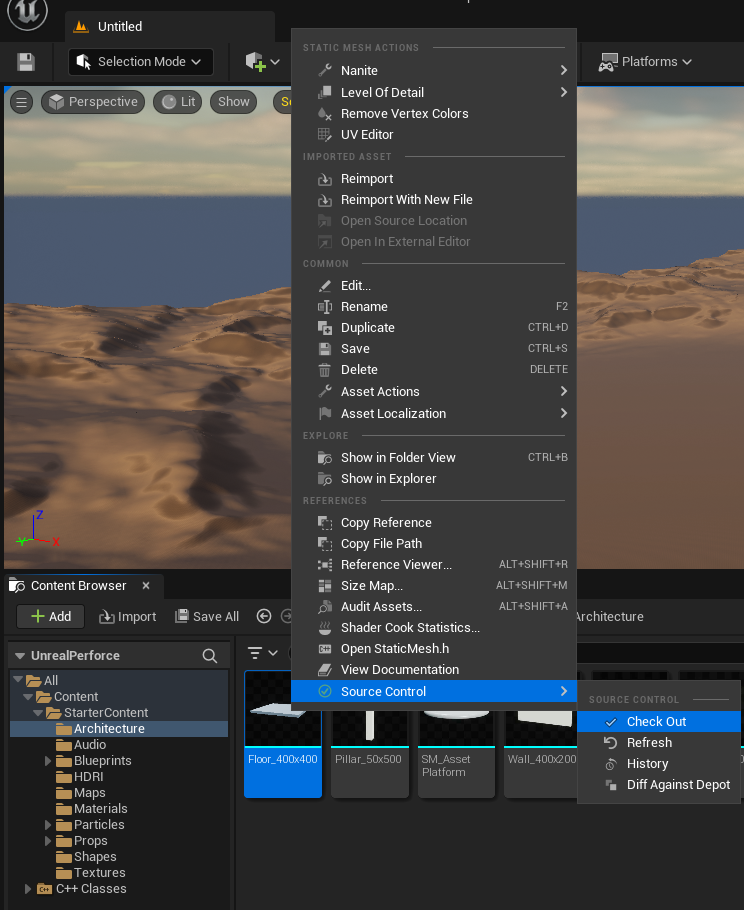
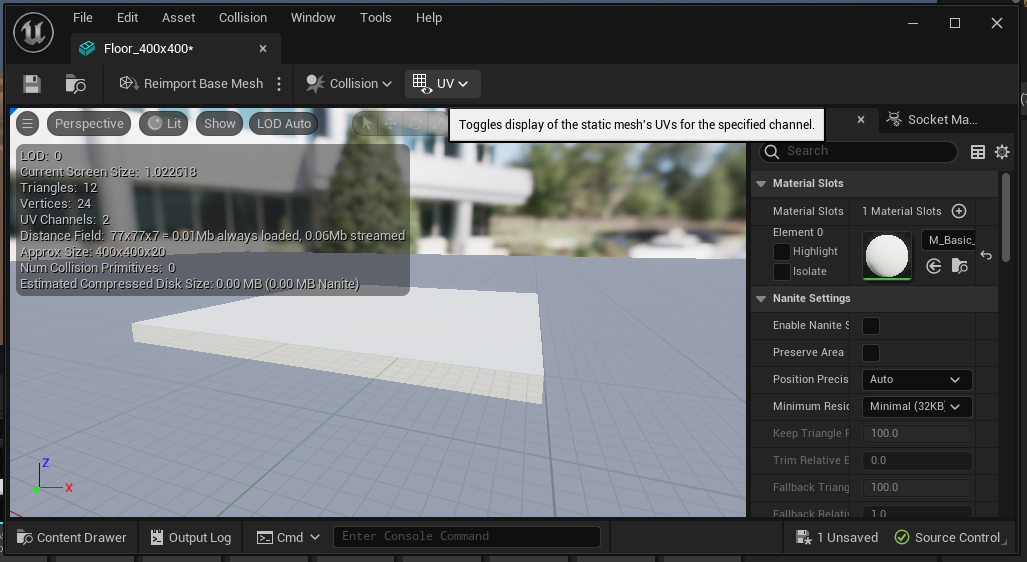
Checking an asset out from within the engine
-
Better workflow for those working on singular files
-
Example with Starter Content's Architecture assets:
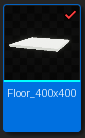
- After a successful check out, a red checkmark should appear on the asset preview
-
Double click to open that asset, then make some change like choosing another material
-
Save and close the editor window
-
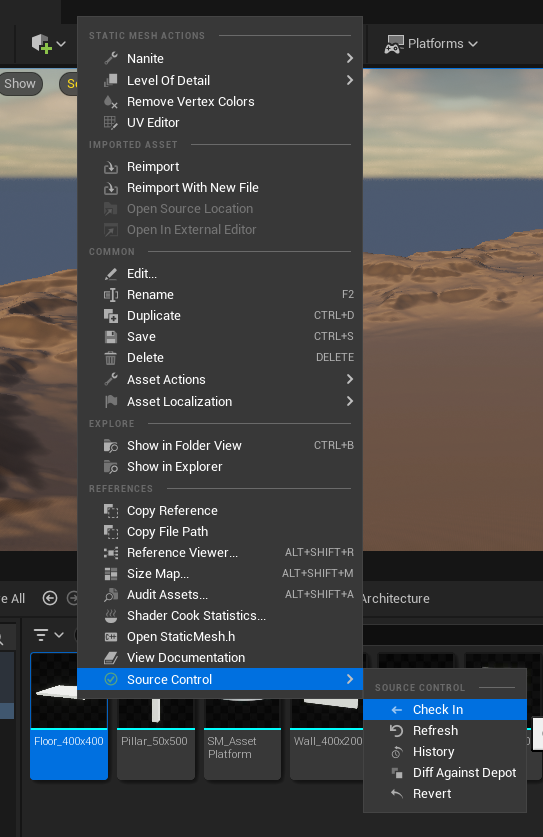
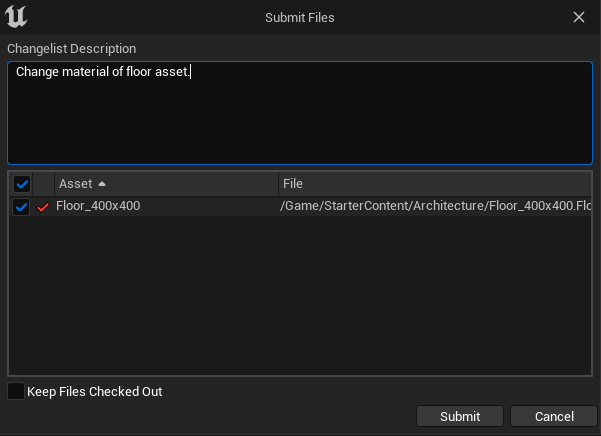
Right click the asset again and Check In
-
The familiar changlist menu should show up from within UE5
- After a successful submission, the red checkmark on the asset should disappear unless you selected the Keep File Checked Out option
-
§ Branching (Part II)
Refer to previous sections for terminology.
This section is relevant for anyone going beyond just having a main stream for everything. Original instructions can be found on Helix Core Visual Client (P4V) Guide.
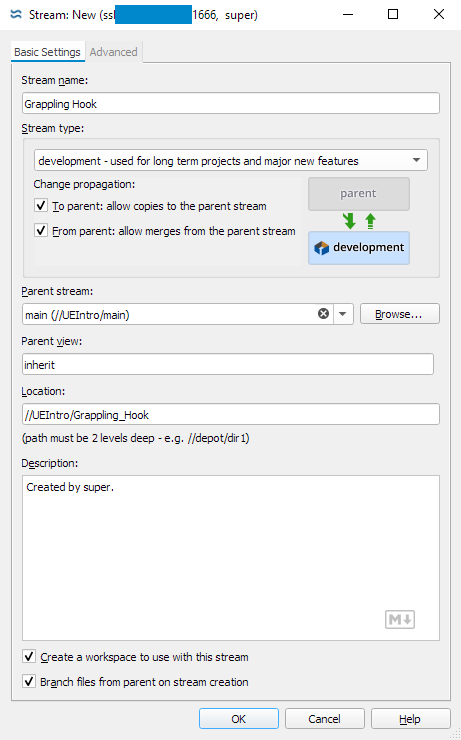
§ Creating a Regular Stream
-
Configure the stream
- What the Perforce documents call "regular" is the
developmentbranch type
- What the Perforce documents call "regular" is the
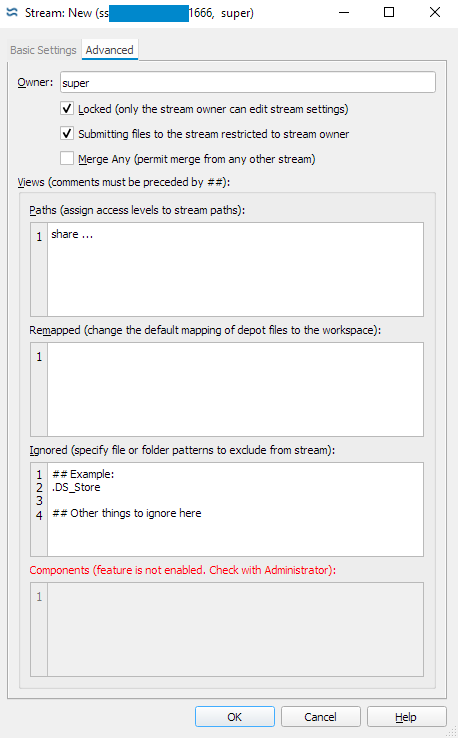
-
Advanced settings include stream priviledges and mapping. The ignore portion is especially relevant, for most part what's in the
.gitignorefile can be used directly here-
Consider locking and restricting submission if this is a collaborative branch
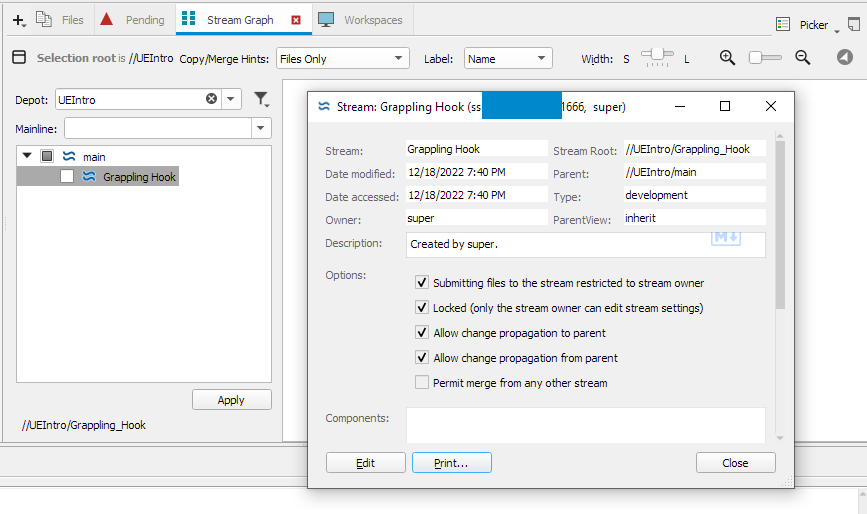
-
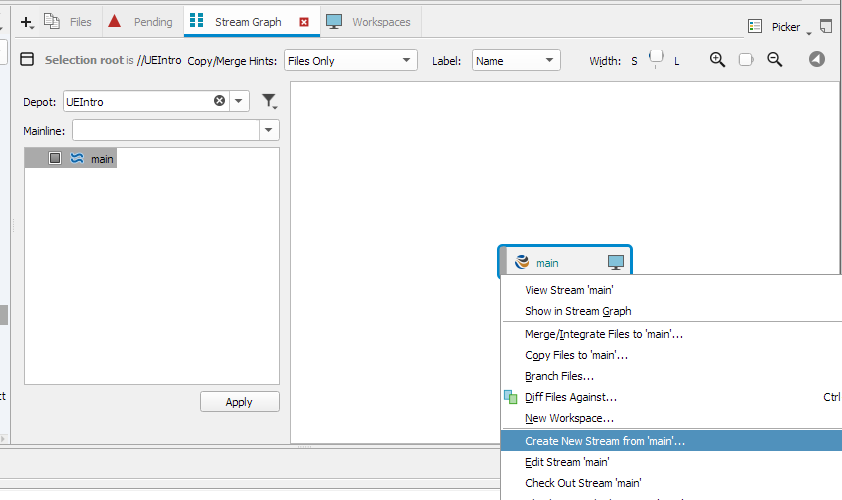
You can come back and edit these settings later by double clicking the stream on the
Stream Graphtab
-
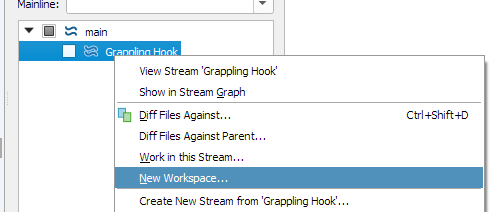
§ Working on the New Stream
- Unlike Git, Perforce opens one workspace locally per stream
-
CAREFUL: this adds to the workspace count
-
You can choose to not create a workspace in the stream settings, and then create your workspace manually on the
Stream Graphtab- My own preference is to only keep one workspace at a time, always in the project root folder
-
The new workspace is going to be empty initially, you will need to
-
Select the root folder in the Workspace tab on the left in P4V
-
Get Latest from the top bar of P4V
-
Remember that check out will lock the file on the server but get latest will not
- This is only relevant if other people are working on the same stream as you
- You can always select the readonly file that Get Latest downloaded for you and check it out when editing it
-
-
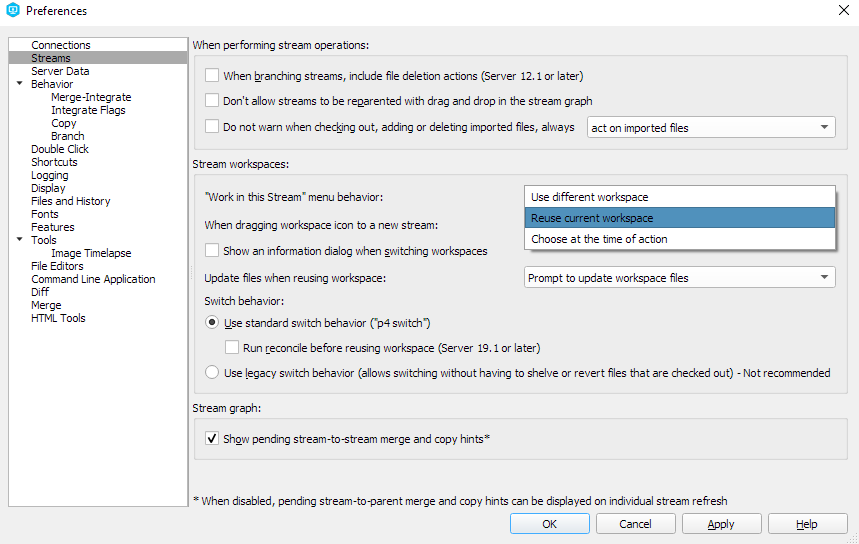
§ Recommended Optional: Reusing Workspaces
Original instructions can be found here.
-
The default behavior of P4V is to create a new workspace
-
To make P4V more similar to Git (and keep it safe under the workspace limit), select
Edit/Preferences/Streamsto change the"Work in this Stream" menu behavior- You can also change the
When dragging workspace icon to a new streambehavior to match
- You can also change the
-
After that, just right click the stream in the
Stream Graphtab in P4V and selectWork in this Streamto reuse your current workspace for the stream -
The procedure before switching streams is exactly like switching branches on Git
- Checkin (commit) or shelve (stash) local changes
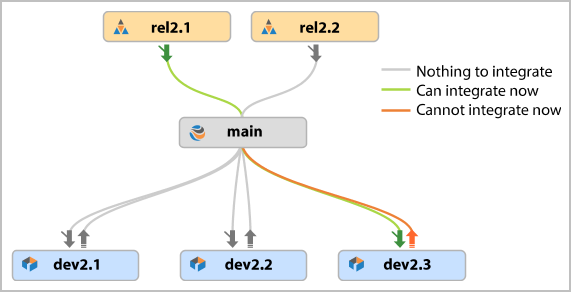
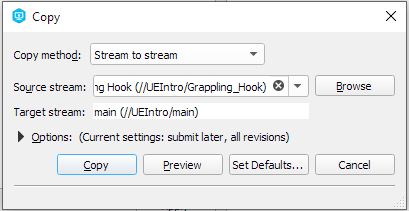
§ Merging Changes
-
After changing some files on the stream and submitting, the stream needs to be merged back to the mainline
-
For reasons, merging is named differently in Perforce
- Merging from stable branches to unstable branches is called merging down
- Merging from unstable branches to stable branches is called copying up
-
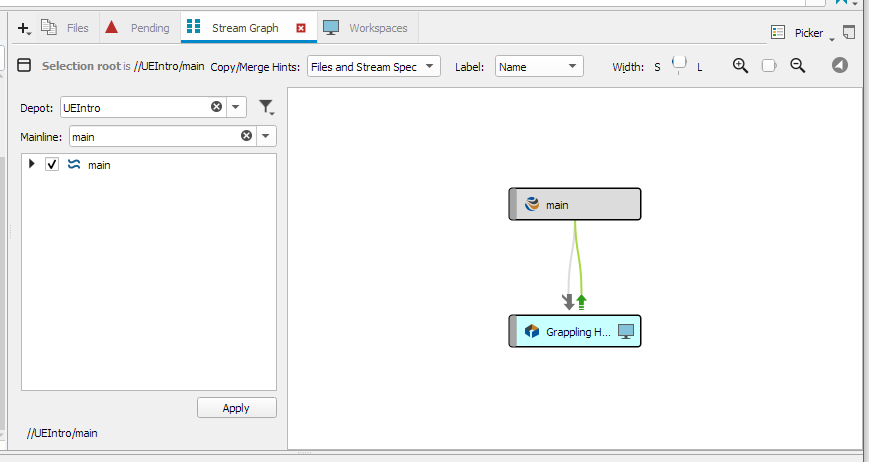
Check the
Stream Graphtab to see that there are changes to be copied up (green upwards arrow)- If both arrows are grey, remember to select
File and Stream SpecorFiles Onlyon theCopy/Merge Hintsdropdown - The change status is indicated by color
orangeis similar to merge conflict (cannot merge down/copy up without making some changes first)greenis similar to no merge conflictgreyis no change
- If both arrows are grey, remember to select
-
Double click your the mainline branch and
Work on this Stream. This is needed for changes to be copied into it. Then double click the feature branch andCopy changes -
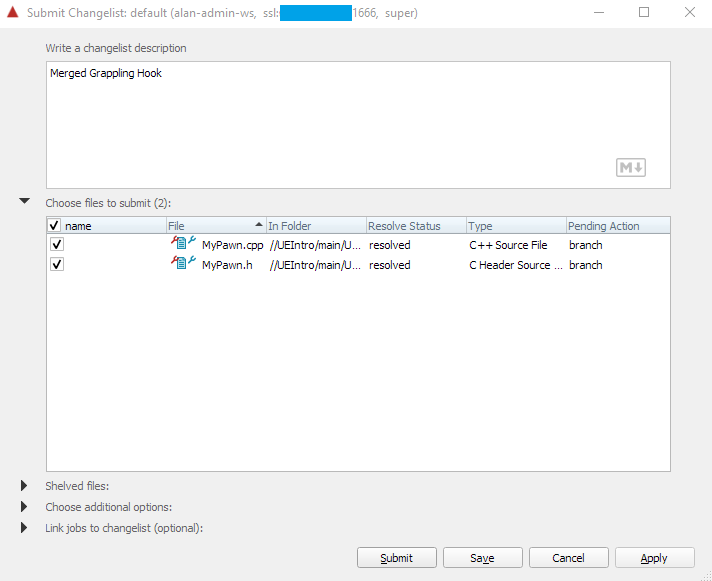
Copy changes, this propagates the submitted changes on the remote server into your local workspace, so you will need to inspect and submit the changes
- This is similar to merging a branch locally, different from merging on the GitHub website
- More accurately, this follows the same steps of checking out your Git
mainlocally and then pulling from a feature branch on GitHub
-
The copied changes can be submitted similar to normal changes

At this point I opened the project again to check if the merged scripts are added, and they did not show up. To fix this, open your editor (VS, Rider, etc.) and rebuild the project, and the script should be showing up afterwards.
At first I thought this was caused by files not added to some make lists. This was not the case, as building the project does not add any non-ignored changes to the workspace.
§ Recommended Optional: Deleting the Feature Stream
Typically your Git feature branch is not deleted after merging. This is not a concern as you have enough server space. However for smaller server spaces on Perforce it is good to delete the feature branch altogether after merging.
- If you chose to lock the stream earlier, you will need to unlock it in Edit Stream before deleting
- Right click the stream on the
Stream Graphtab and Delete Stream- This deletes all the non-modified files
- The files modified while working on the stream will be kept in the stream, you can obliterate them later
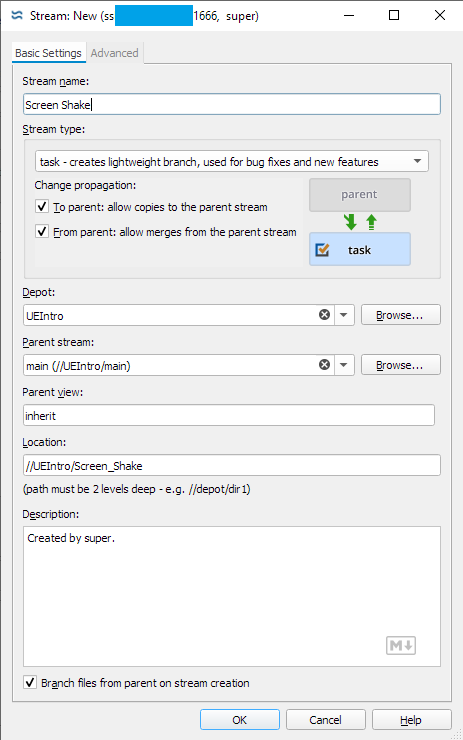
§ Recommended Optional: Task Streams
-
Task streams are smaller and saves more space as long as less than half of all files are changed
- Limitations: task streams cannot have child streams and cannot be reparented, but these functionalities are rarely needed anyway
-
To create task streams, create a stream normally but select
tasksas its type- You can specify advanced settings as well, step omitted
- Unlike regular streams, there is no option to create a separate workspace
You can create task streams in a separate depot or without parents as well. Perforce gives documentation for these options.
-
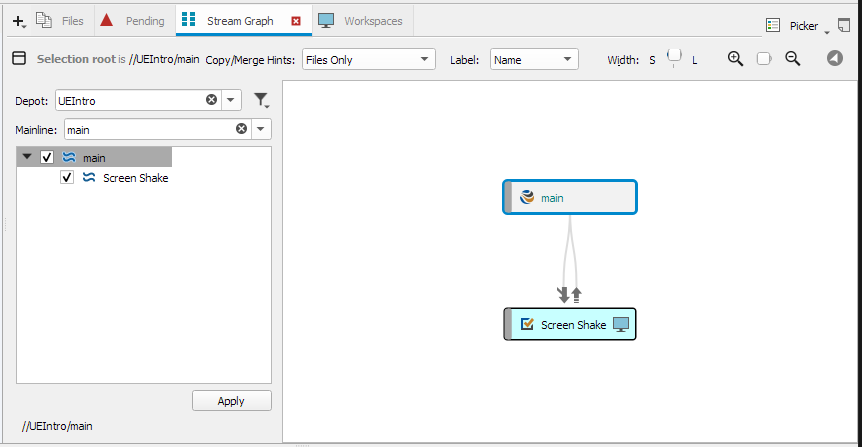
Verify that an empty branch has been created, and that your current workspace is set to working on this new branch
-
Merging and deleting task streams is exactly the same
The recommended alternative for deleting task streams is unloading them. To do so, right click the task stream and
unloadit to an unload depot (you can create one if there isn't any).Unloaded task streams can be reloaded later on. You can also obliterate unload depots when the server is running out of storage.
§ Pull Requests (Code Reviews)
- Helix Core is like Git in that it does not come with pull request functionality on its own
- Technically it is possible to set up a Helix Swarm server that adds code review, but the setup is convoluted (including hosting a separate Apache2 Perforce site, adding that site to DNS, etc.) so the steps will be omitted here.
- Relevant documents are Helix Swarm Quickstart, Helix Swarm Runtime Requirements and Downgrading PHP from 8.0 to 7.4 (relevant for Ubuntu 22 LTS that Swarm does not support automatically)
§ Backups
§ Checkpoint
- Checkpoints are created manually and can be used to restore metadata (ex. changelists), but not versioned file content
- By default, each server is configured with nightly checkpoint
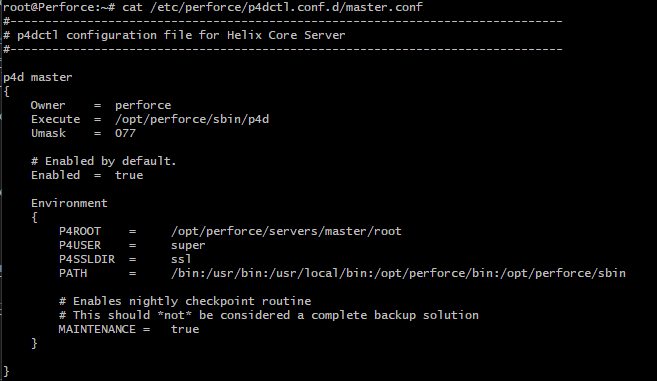
-
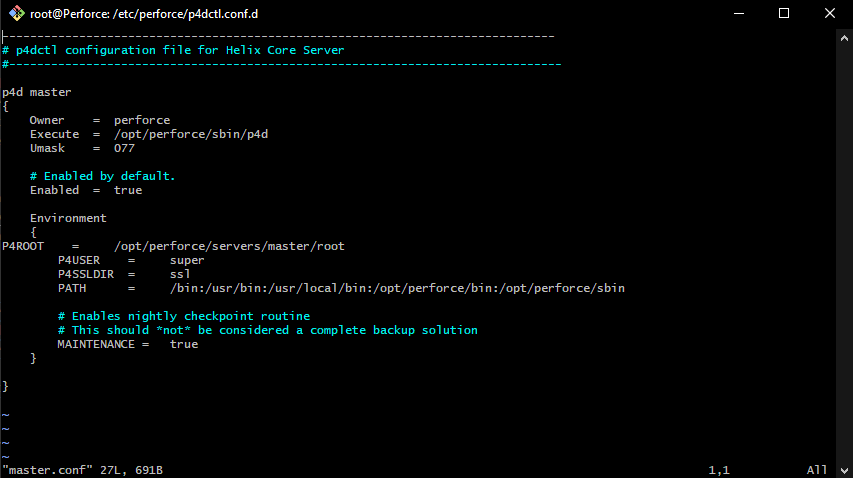
To check this, log in to the server and view the configuration file, usually located at
/etc/perforce/p4dctl.conf.d/<p4d server name>.conf
-
§ File Syncing With RSync
- It is better to use
rsyncinstead of manually downloading every checkpoint file from the server folder
§ RSync on Mac
- On Mac, install
rsyncwith HomeBrew
§ RSync on Windows
-
Go to the MSYS2 repository and find the following packages (ending in
.zst)rsync-3.2.3-1libzstd-1.5.0-1libxxhash-0.8.0-1
These versions come from a somewhat dated tutorial. At time of writing all these packages already have newer versions. If you want to you can look for dependencies of the newest RSync on MSYS2. To do that, only install RSync and run
rsync --version, it will give you errors that look likecannot locate libzstd-<version number>. Find the corresponding version number on MSYS2 and install, then repeat untilrsync --versionpasses. -
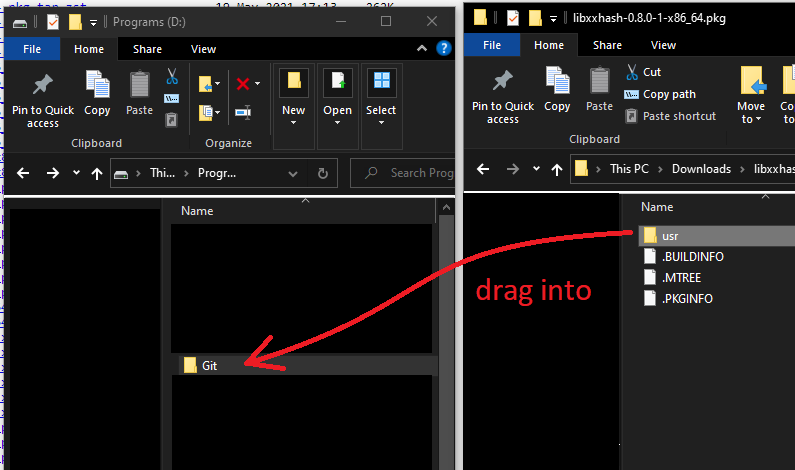
Extract each
.zstfile with WinRAR, note that in each there is ausrfolder -
Go to the location of your git installation, note there is also a
usrfolder -
Merge the content of each
usrfolder by dragging theusrof each package to the parent of Git'susrfolder -
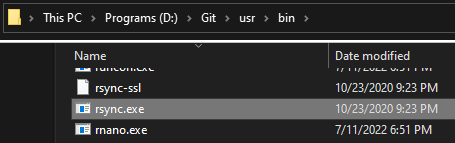
Check that your Git's
usr/binfolder now contains new executables likersync -
Optional: Restart your computer just to be sure Git Bash can recognize these newly installed packages
-
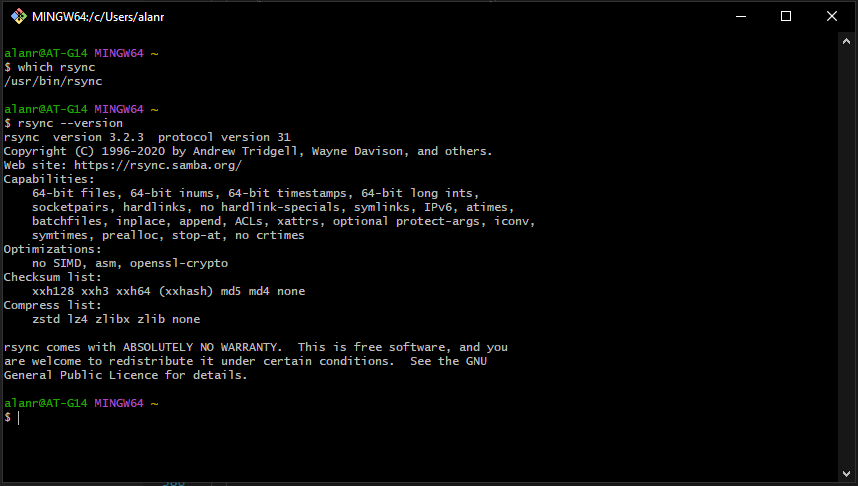
Start Git Bash and verify the following two commands return similar results as below
§ Syncing With Server Journals
-
Start Git Bash
-
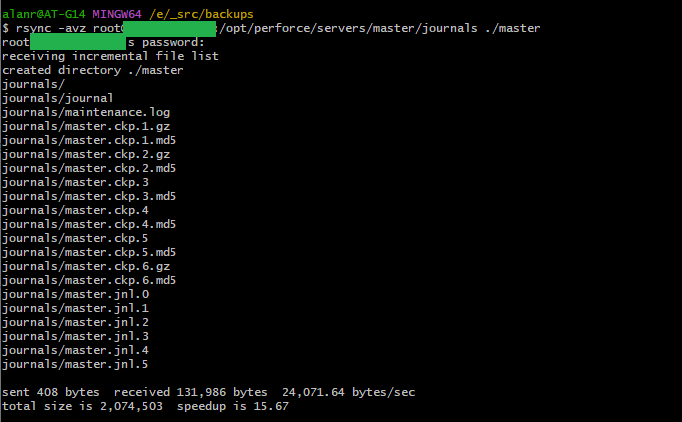
Run
rsync -avz root@<your ip or domain>:/opt/perforce/servers/<server name>/journals /path/to/local/desinationwhere theavzflag means verbose (print each file out when syncing), archive (a shortcut for a bunch of options like recursive and etc.), and compress (during transfer) -
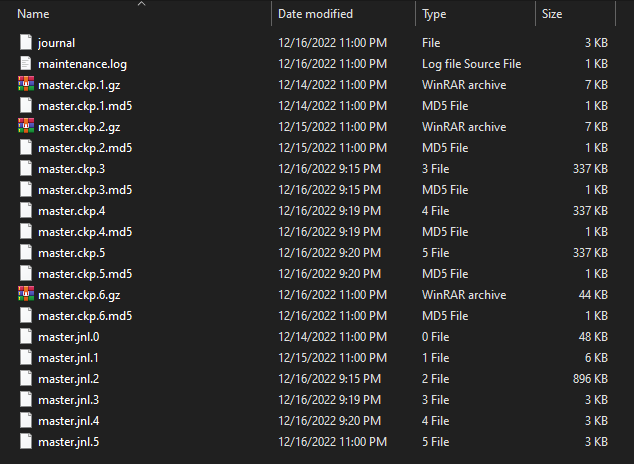
You now have a local copy of all checkpoints and journals on your server
§ Optional: Downloading Versioned Files
- To back up file content in addition to metadata, you also need to download the
archivesfolder under the server root directory (sibling of thejournalsdirectory)This step is not really necessary if you bought server backup, unless you want to nuke the server and rebuild from scratch
rsync -av root@<your ip or domain>:/opt/perforce/servers/<server name>/archives /path/to/local/desination- Note that these files are versioned and compressed already, so
- They cannot be used directly in UE5
- The
-zflag can be omitted
§ Alternative: File Syncing with SCP
- The SCP (SSH Copy) command downloads the entire folder from the server to your local machine
- It is built-in on Git Bash so you don't have to worry about the MSYS2 hassle
- It always copies the whole directory / whole file which is slower and wastes some bandwidth, whereas RSync skips the equivalent portions
- Run
scp -r -C source destinationinstead ofrsync -avz source destination- the
-rcorresponds to the recursiveness included in-ain RSync - the
-Ccorresponds to-zin RSync
- the
§ Recommendations
- Download the
archivesfolder before deleting the server if you cannot log in locally throughp4for some reason- If you can, check out archiving
- Even though checkpoints are created daily by default, still run
p4 admin checkpoint -zbefore you runrsyncfor the checkpoint files
§ Restoring to a Corrupted Server
The original instructions include many different cases, this follows one of them described here where both versioned files and checkpoint files are corrupt
- stop the server with
p4 admin stoplocally orp4dctl stop <server name>on the server
§ Optional: Upload the versioned files to the archives folder
This step is only needed if you lost/deleted all the server data. You can try to restart the server locally too by running
p4 admin restartif you have logged in withp4before.
rsync -avz /path/to/the/local/folder/called/archives root@<your ip or domain>:/opt/perforce/servers/<server name>- On the server, give ownership of the files to the user called
perforcechown -R perforce /opt/perforce/servers/<server name>/archiveschgrp -R perforce /opt/perforce/servers/<server name>/archives- This is because these folders should be created by the
perforceuser, but instead is created (i.e. uploaded) by therootuser
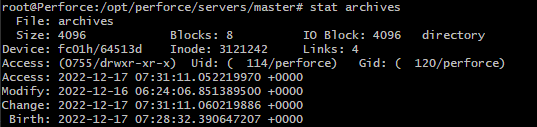
- Verify that the folder ownership is correct by running
stat /path/to/archives/folder, pay attention touidandgid
- On the server, give ownership of the files to the user called
§ Uploading the Checkpoint
-
Optional: If the checkpoint is created with the
-zflag (i.e. if it is in.gzformat likemaster.ckp.6.gz), rungzip -d <checkpoint file>from Git Bash to extract it locallyLater when going over a separate document, this step is not needed for versions after 2018. The later commands can recognize compressed files automaticallly!
-
Upload checkpoint file to your server with
scp -C <checkpoint file> root@<ip or destination>:/root -
On the server, navigate to
~(i.e./root) and uselsto check that the file has been uploaded -
Copy the checkpoint file to the perforce server
cp ~/<checkpoint file> /opt/perforce/servers/<server name>- This step is needed because we need to run the restoration step as the
perforceuser, who cannot read therootuser's home directory
- This step is needed because we need to run the restoration step as the

§ Using the Uploaded Checkpoint
- Remove auto generated
dbfiles in the new server (or corrupteddbfiles in the old server)rm /opt/perforce/servers/<server name>/root/db.* - Use
p4dto restoredbfiles based on the uploaded checkpoint file-
sudo -u perforce p4d -r /opt/perforce/servers/<name of server>/root -jr /opt/perforce/servers/<name of server>/<checkpoint file>- The
-jrhere means journal restore
- The
-
The first path is actually the value of
$P4ROOTas preserved byp4dctl, to check the value inspect the file/etc/perforce/p4dctl.conf.d/<server name>.conf
-
- Restart the server
p4dctl restart <server name> - Remove the copied checkpoint files
rm /opt/perforce/servers/<name of server>/<checkpoint file> - Verify that everything is stored from your local P4V and P4Admin client
- CAREFUL: your current server password will be wiped, the old password before backup is needed to log in
§ Optional: Apply Journal Changes
- Journals record changes between checkpoints, which makes your metadata restoration more up to date
- However there is a chance for the restoration not to work if your journal is more up to date than your versioned file backup (for example, if it records metadata about a newly added file after your versioned file + checkpoint backup)
- To use the journal file, just add it to the
p4d [...] -jv [...]command in the previous section- You can append separate journal files as such:
p4d -r . -jr checkpoint.42.gz journal.42 journal.43 journal(from Perforce)
- You can append separate journal files as such:
§ Saving Space
This section adopts from the admin quickstart
- The server storage might not be enough, and in this case some versioned binary files can be transferred out of it to savev space
- There are 3 main ways to remove files from the depot
delete: makes files undiscoverable in the most up-to-date version, but does not save any server spacearchive: transfer files to another server/depot that is stored elsewhere, can be restored laterobliterate: remove file from the server without storing it elsewhere, saves space but cannot be restored
§ Oblitering
As it is not possible to mount a removable drive on my Vultr server, archiving is not possible for me at least not in a convenient way. The official documents still recommend archiving, please choose that over oblitering if possible.
Although there is a section for oblitering right beneath archiving on the Helix Core Server Administrator Guide, I still recommend doing it on P4V instead of commandline contrary to the document.
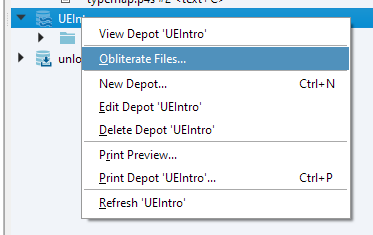
-
Open P4Admin and navigate to the
Depotstab on the right -
Right click the designated depot and Obliterate Files
- You can select to obliterate revisions based on date and number
-
You can also right click specific files after expanding the view. This is preferable when you only want to deal with a few large binary files and keep all the other file versions intact.
§ Alternative: Archive
- It is technically possible to mount a remote drive on the Linux server that links back to your own device. Some relevant tools are SSHFS although you will need to make your local device connectable using SSH
- After that, you can create an archive depot with the root directory on the remote drive. This way the server itself is still on the remote but the files are local, although performance is significantly worse
- Since you can mount volumes locally with no limit, it is possible to set the server root on some external hard disk
- Alternatively you can get a cheap server from VPS vendors elsewhere with no concern of disk performance and SSH there instead from your first server
- For more about archive depots, reference Perforce documentation on how to archive and restore files
§ Organization Notes
- Before pitching your game, consider whether the active team size is going to be over the limits of Perforce's free plan. If so, consider letting artists upload on Google Drive instead and assign asset integration tasks to yourself (or others already )
- Organize your releases so that you can obliterate early commits to save space
- Try not to leave branches hanging
- Prefer task streams over child streams to save space on the server
- According to Perforce task streams are better as long as the stream does not edit half of all the files
- This is almost always the case unless the task is for refactoring the whole project or changing line endings
§ Misc. Actions
Things that are not relevant to the walkthrough but were tested on the server / my local machine to fix issues or just explore. Might still be useful.
§ Deleting a Specific P4D Server
- Log in to server commandline and
- Stop that service if it is already running
p4dctl stop <service name> - Remove the server configuration file
rm /etc/perforce/p4dctl.conf.d/<service name>.conf - Remove the server storage
rm -r /opt/perforce/servers/<service name>
- Stop that service if it is already running
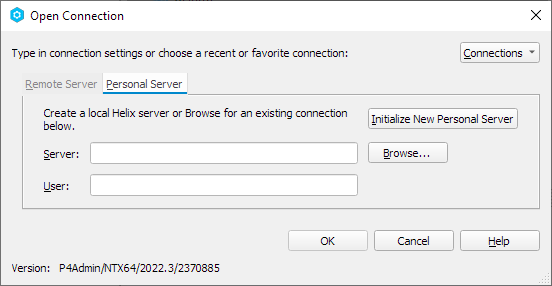
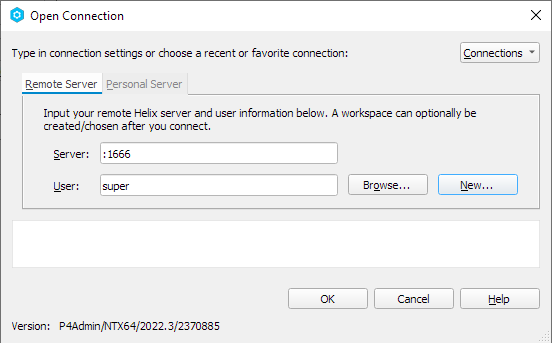
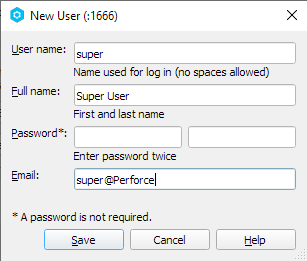
§ Open a Local Server With P4V
Originally this part was written for offline archiving, but there is no convenient way to communicate between different servers so it was not possible. The process is still relevant if you want to use Perforce locally for individual projects.
- The local server will be stored on your local machine, so it doesn't take up server space
Currently the distributed server version does not work very well, at least on my device. You need to check your p4 installation to see if it is distributed by seeing if the folder containing
p4.exealso contains a folder calledDVCSthat containsp4d.exe(you can find the folder by runningwhich p4on Git Bash).If you did install the distributed version, delete the
DVCSfolder andp4.exeand download the Helix Core Server for Windows. There, select to installHelix Server (P4D)andHelix Commandline (P4)and set the path to the old installation folder.
-
Choose a directory to start your local server
-
Choose to connect to this server on the client (you can change this later)
-
Open P4Admin and right click in the
Connectionstab to open a new connection -
This time use the local connection
-
The
superuser needs to be created first withNew- You can now log in as
super
- You can now log in as
§ Misc Issues
§ P4DCTL Not Restarting
-
Running
p4dctl stop -asucceeds, and thenp4dctl restart -adoes not actually restart the server. Very little explanation is given in the documentation and forums.- Check the ownership of your server root's parent folder, typically
/opt/perforce/servers/<server name>- Change the
uid(owner user id) andgid(owner user group id) toperforcechown -R perforce /opt/perforce/servers/<server name>chgrp -R perforce /opt/perforce/servers/<server name>
- Try running again
- Change the
- If it still fails, delete the server that does not start and run the configuration script again (
/opt/perforce/sbin/configure-helix-p4d.sh) to initialize an identical server (remember to backup first) - If completly rebuilding the server fails, you will need to nuke the Linux server and restart from scratch.
- Check the ownership of your server root's parent folder, typically
-
If the failure was after an aborted checkpoint or other similar operation, try this post's solution
- Run
p4dctl exec -t p4d <server name> -- -xuwhich apparently resets some state lock file in the server directory - Then run
p4dctl start <server name>to restart the server
- Run
§