Customizing Render Pipeline for Water Optics in Dive
Play Dive on Itch.io!
§ Overview
-
The endgoal is to achieve reflection, refraction and other water effects under URP and Unity's pixel perfect environment
-
The design itself is straightforward, most of this walkthrough is about
- Adjusting the render pipeline under URP constraints
- Verifying the pipeline with the Frame Debugger
- Sampling pipeline outputs (render textures) to create visual effects
-
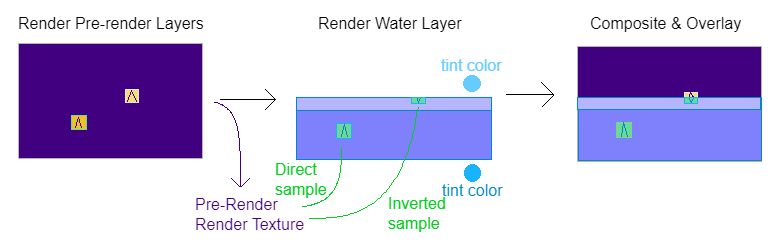
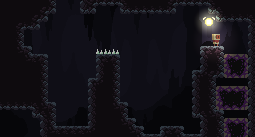
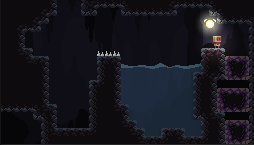
Final product
- The thin layer at the top reflects
- The rest of the water refracts
The water physics is already implemented thanks to Logan Bowers using a vertex displacement custom post-processing shader. This walkthrough is only the optics.
§ Design
-
As the game itself is highly stylized, a simplistic water model would be the most simple and versatile route to go
-
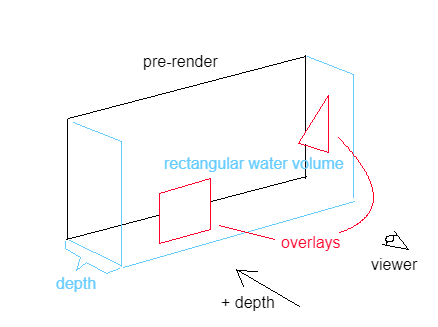
Although water is conceptualized as a volume, the only important section is the water "surface" (at the side of overlays)
-
Conceptual pipeline
§ Renderer Features Implementation
Following code uses
Unity 2021.3.15f1withURP 12.1.8. Some methods likeblitare deprecated the most up to date URP version, please refer to forums and official docs for best practices.
- A render pipeline describes how data in the game is transformed into graphic outputs, including the order of rendering, different types of lighting (forward, deferred, etc.), and graphic outputs outside the screen itself.
- The Universal Render Pipeline (URP) is what Dive uses, the other major ones are the high definition render pipeline (HDRP) and the built-in render pipeline
- Unity exposes pipeline customizations through the scriptable render pipeline, which is what URP is implemented with
- The SRP allows:
- A Renderer Feature is a feature added to the render pipeline with its own responsibility
- There could be multiple instances of the same feature
- A Render Pass: is an operation that a render feature could insert into the pipeline
- A Renderer Feature is a feature added to the render pipeline with its own responsibility
- Two renderer features are needed
- An
EarlyOutfeature that writes the rendering result to some render texture - A custom implementation of
Render Objects* that
- Handles 2D rendering
- Allows overriding materials and targets (render textures to write to)
- Integrates with URP lighting
* The URP ships with an experimental renderer feature called
Render ObjectsRender Objectscan be called at any time to render objects using an override material- The feature did not work well with 2D pixel perfect (possibly caused by 2D-only shader flags)
- An
§ Before You Start: Frame Debugger
-
The frame debugger could be found from the top bar
Windows / Analysis / Frame Debugger -
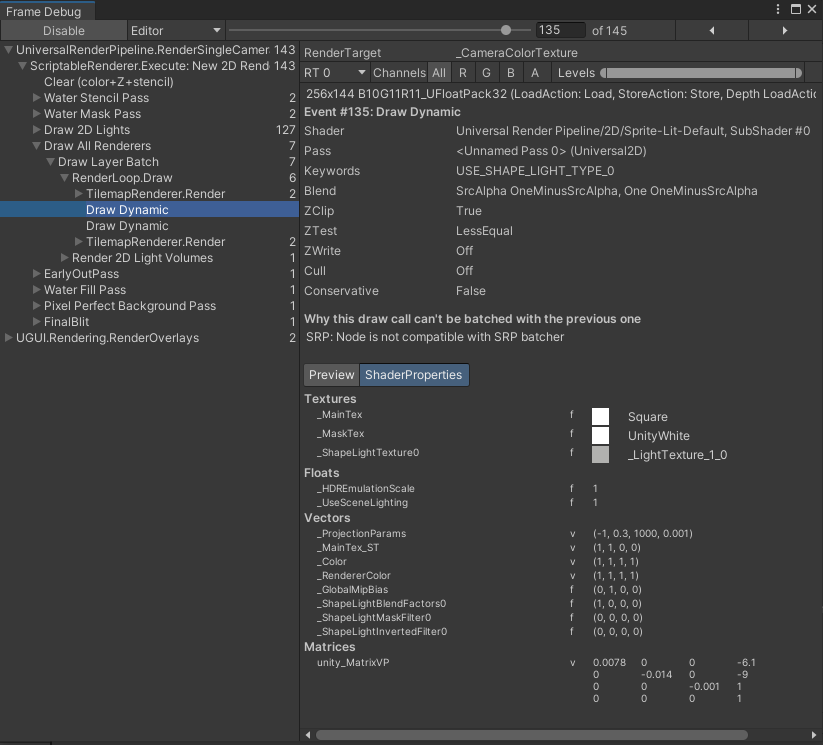
Different rendering operations are traced in the frame debugger
- Each operation is a draw call, meaning the CPU sends that operation along with related data to the GPU
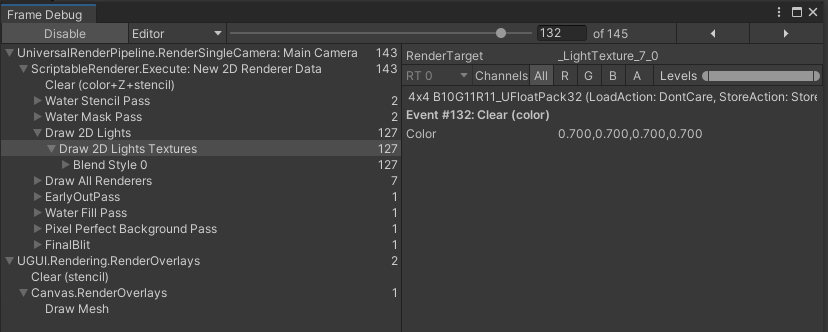
- The top bar goes through 145 total draw calls in the current scene, the 132th is selected
- On the left, all command buffers (see next section) are shown in the order that they are called
- On the right, details about the selected draw call are shown
- The call's results are written to
_LightTexture_7_0 - A parameter passed to the call is
Colorwith value(0.7, 0.7, 0.7, 0.7)
- The call's results are written to
- Each operation is a draw call, meaning the CPU sends that operation along with related data to the GPU
-
For more complex example
§ Generic Single-Pass Render Feature
public class MyFeature : ScriptableRendererFeature
{
    /* ... variables ... */
    MyPass pass;

    public class MyPass : ScriptableRenderPass
    {
        ProfilingSampler m_ProfilingSampler = new ProfilingSampler(nameof(MyPass));

        public EarlyOutPass(
            /* params */
        ) {
            // ...
        }

        public override void Execute(
          ScriptableRenderContext context, ref RenderingData renderingData)
        {
            if (renderingData.cameraData.camera != Camera.main) return;
            var renderer = renderingData.cameraData.renderer;

            var cmd = CommandBufferPool.Get(nameof(EarlyOutPass));
            using(new ProfilingScope(cmd, m_ProfilingSampler))
            {
                // do things
            }

            context.ExecuteCommandBuffer(cmd);
            CommandBufferPool.Release(cmd);
        }
    }

    public override void AddRenderPasses(
      ScriptableRenderer renderer, ref RenderingData renderingData)
    {
        renderer.EnqueuePass(pass);
    }

    public override void Create()
    {
        pass = new MyPass(
            /* params */
        );
    }
}
- A
ScriptableRenderContextdescribes the current state of the SRP - A
CommandBuffercontains commands that are inserted into it- A buffer pool holds available buffers
- calling
context.ExecuteCommandBufferexecutes everything in the buffer (this minimizes having to call everything separately)
- The
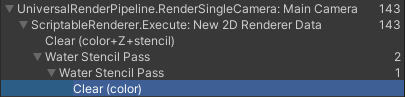
ProfilingSamplerhelps the frame debugger trace rendering operations-
Operations in the same named buffer show up in a group
-
ex. The
Clearoperation in theWater Stencil Pass(an instance of theDFRenderObjectsfeature)
-
- Triggers
-
To trigger a pass based on an event, declare a
RenderPassEvent triggervariable in theRendererFeature -
Pass this variable to the render pass
public class MyPass : ScriptableRenderPass {
  MyPass(RenderPassEvent trigger) {
    renderPassEvent = trigger;
  }
}
-
- Other parameters
- Subclasses of
ScriptableRenderPasscan have constructors of any signature, meaning you get complete control over which parameters to pass to it
- Subclasses of
- For following custom features:
- Assume each of them has a trigger
- Other parameters will be listed
- Other operations
§ Renderer Feature: Early Out
- Variables
- A
RenderTextureinstance to write to
- A
- Operations in profiler scope
// flush buffer context.ExecuteCommandBuffer(cmd); cmd.Clear(); // frame debugger: Blit sets the target of the entire buffer to rt cmd.Blit(renderer.cameraColorTarget, rt); // set target back co camera color cmd.SetRenderTarget(renderer.cameraColorTarget);- Note the
contextactions are not outside the profiler scope, this is to clear the buffer beforeBlitso that nothing is partially rendered in the pre-render Blittakes what's in the current render target and copies it to a target texture- Special care might be needed to set up an equally sized target texture. In Dive this is done manually.
The blitting process is completely different in newer versions of URP.
- Note the
§ Renderer Feature: DF Render Objects
Implementation process:
- Usually I prefer going through the thought process in the writeups, but for this renderer feature it's mostly just inspecting what's in the frame debugger and URP shader source code to find the right keywords
- The
Universal2Dand shape light keywords are not present in URP'sRenderObjectsfeature, which is probably why it didn't work out of the box- The "tutorial" referred to in the code comes from URP docs. Note it is not the latest version.
- Variables
- A
rttarget and aclearflag for that target - A
useURPLitflag - A
Layermask for filtering - A
SortingLayerid (integer) - A
BlendModeid (integer) - A
overrideMaterialto draw the filtered objects with
- A
- Additional setup in pass constructor
_m = overrideMaterial; renderPassEvent = trigger; filteringSettings = new FilteringSettings(RenderQueueRange.all, layerMask); if (sortingLayer >= 0) { filteringSettings.sortingLayerRange = new SortingLayerRange(sortingLayer, sortingLayer); } m_ShaderTagIds = new List<ShaderTagId>() { new ShaderTagId("SRPDefaultUnlit"), // from tutorial, probably harmless new ShaderTagId("UniversalForward"), // for unlit pass new ShaderTagId("UniversalForwardOnly"), // for unlit pass new ShaderTagId("Universal2D") // added on top of tutorial, comes from URP Hidden/Sprite-Lit-Default source }; m_RenderStateBlock = new RenderStateBlock(RenderStateMask.Nothing); this.useURPLit = useURPLit; if (useURPLit) { // CAREFUL: this is hardcoded and might depend on URP version urpLightKeyword = $"USE_SHAPE_LIGHT_TYPE_{blendMode}"; } - Additional setup in
Execute(but before profiler scope)var criteria = SortingCriteria.CommonOpaque; var drawingSettings = CreateDrawingSettings(m_ShaderTagIds, ref renderingData, criteria); drawingSettings.overrideMaterial = _m; drawingSettings.overrideMaterialPassIndex = overrideMaterialPassIndex; if (useURPLit) { drawingSettings.overrideMaterial.EnableKeyword(urpLightKeyword); } - Operations in profiler scope
// flush buffer context.ExecuteCommandBuffer(cmd); cmd.Clear(); if (rt != null) { cmd.SetRenderTarget(rt); if (clear) { cmd.ClearRenderTarget(false, true, Color.black); } } context.ExecuteCommandBuffer(cmd); // DrawRenderers doesn't respect buffer order so the above commands need to be done immediately cmd.Clear(); context.DrawRenderers(renderingData.cullResults, ref drawingSettings, ref filteringSettings, ref m_RenderStateBlock);- Note the
contextactions are not outside the profiler scope, this is to clear the buffer beforeDrawRenderers. The same is done in URP'sRenderObjects.
- Note the
§ Assembling The Pipeline
-
The actual assembled pipeline is unlike the conceptual pipeline
-
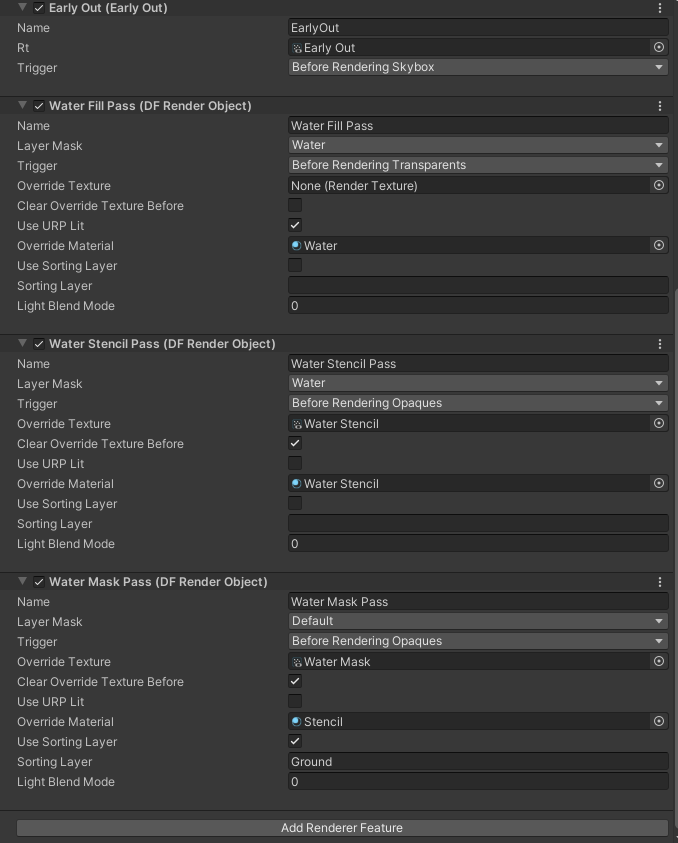
In order, the pipeline consists of the following features
BeforeRenderingSkyboxis chosen because it comes after opaques. TheAfterRenderingOpaquesdid not work.BeforeRenderingTransparentsis chosen because it comes after skybox- The screen crop is out of order because the editor does not support rearranging... so the features are in the order in which they're added
-
In chronological order...
- The
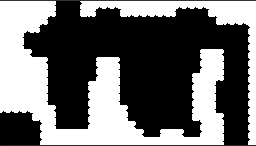
WaterMaskPassdetermines what comes before water (in this caseground) - The
WaterStencilPassdetermines the shape of the water itself, used later to determine where the water surface is - The
EarlyOutpass draws the pre-render objects to a render texture so the water shader can sample it - The
WaterFillPassdraws the water itself
- The

§ Shaders
It is always good to reference shader sourcecode. Some major ones used when making the following shaders are
- Built-in shaders for the built-in render pipeline
- Shaders in the URP library, you can find them in the Package folder
- Generated shader code from shader graph
§ Stencil
- Sample the alpha channel from the sprite and write it to the output. This is needed in case some sprite does not fill its mesh
- Disable
Depth Writeso it does not interfere with the rest of the rendering process - Always render this layer since it is meant to come in front of everything else
§ Water Stencil
- The water stencil is separate solely because it needs vertex displacement that exactly matches the water shader itself, otherwise it is completely the same as the Stencil shader
§ Water
-
Refraction (outputs the color
c)-
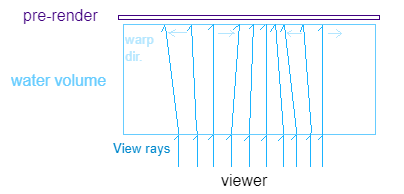
Concept
- Unlike real life, view rays stay parallel to each other and perpendicular to the game screen
- Unlike real life, refraction angle does not depend on the incident angle (Snell's Law) but rather some arbitrary warping angle
-
Code
// map x back to [0, 1] before returning float2 uv = scr.xy; uv.x += wobble / 256.0 * round(sin(time * speed + scr.x * 10)); // prevent edge artifacts, do not sample outside the water boundary float stencil = mask.Sample(state, uv); float4 c = 0; if (stencil < 0.5) { c = preRender.Sample(state, uv); } else { c = 0; } c = float4((c.x + tint.x)/2.0, (c.y + tint.y)/2.0, (c.z + tint.z)/2.0, c.w);scris the screen-space coordinate of the current pixel from0, 0to1, 1
-
-
Reflection (outputs the color
c)float distToSurface = 10000; float2 scr2 = scr; scr2.x = scr.xy; float4 c = 0; for (uint i = 0; i < 4; i++) { float2 up = scr2.xy; const float d = i / 144.0; up.y += d; float upper = stencil.Sample(state, up).r; if (upper < 0.1) { distToSurface = d; break; } } if (distToSurface < 9999) { float4 sample = preRender.Sample(state, scr.xy + 2 * float2(0, distToSurface)); sample = float4(sample.x * tint.x, sample.y * tint.y, sample.z * tint.z, sample.w); c = saturate(sample + ambient); } else { c = 0; }- The shader first probes upward for upwards of 4 pixels, the number of steps it takes to reach non-water is the depth of water at that pixel
-
Clipping
- The water mask is sampled with the
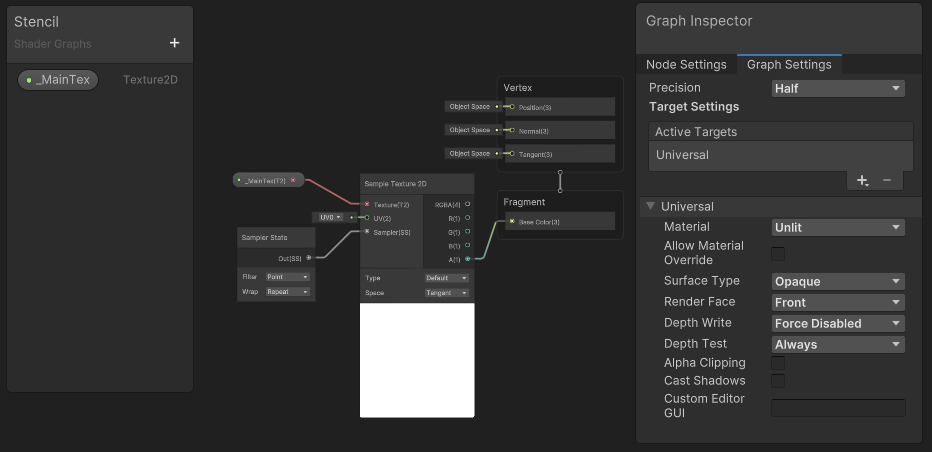
scruv and passed to the outputalphachannel - The shader graph itself is based on the
Sprite Unlitmaterial with blendmodealpha(see Graph Settings)
- The water mask is sampled with the
Refraction and reflection are separated to allow custom mixing.
§